Recipe Sunday – Jeera Aloo Cumin Spiced Potatoes

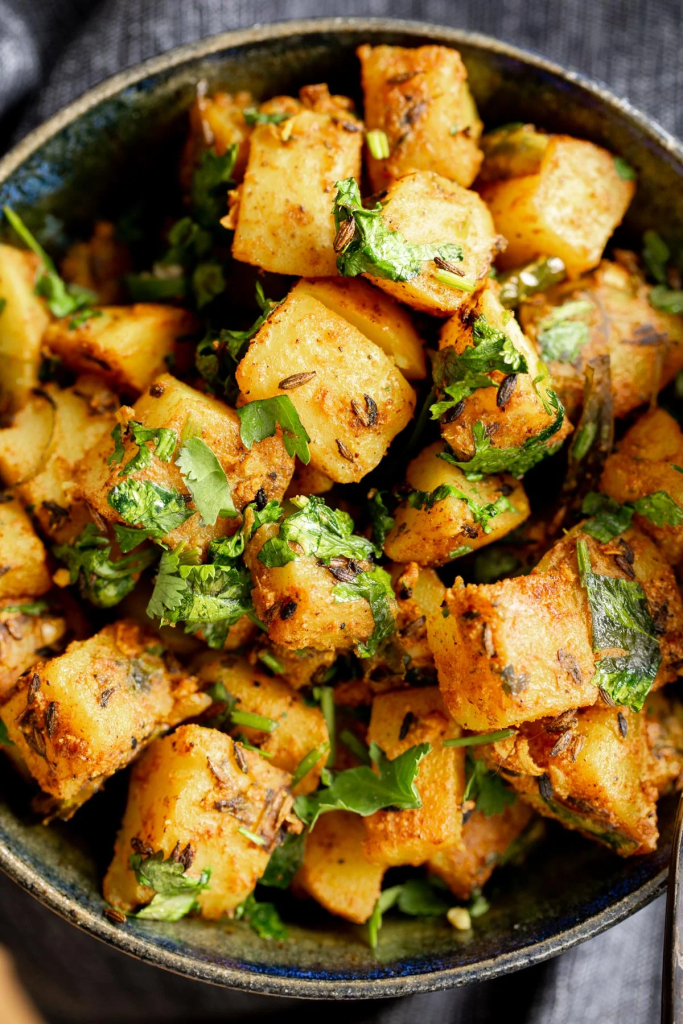
Hello kittens! How are you? It’s been ten days since last time I wrote: I had 2 busy weeks and I am on my second Saturday working (next one will be the third I do in a row), I was at a christening, an opera, taekwondo pre-grading, film night, plus a lot happening at work. And still doing the Limpia, although on two occasions I had some bread. However, one dish that is definitely Limpia-friendly and I have enjoyed recently were these Jeera Aloo Cumin Spiced Potatoes by VeganRicha: perfect for a weekday dinner that is whipped up in just 4 steps and delicious!

Jeera Aloo Cumin Spiced Potatoes by VeganRicha

Ingredients

  • 2 (340 g) medium Yukon gold potatoes boiled, peeled and cubed, into ½ to ¾ inch pieces
  • 1 teaspoon oil
  • 1 ½ teaspoons cumin seeds
  • 1 hot green chili finely chopped or thinly sliced
  • 1 teaspoon minced ginger
  • ½ teaspoon turmeric
  • 1 teaspoon ground coriander
  • ½ to 1 teaspoon garam masala
  • ¼ to ½ teaspoon cayenne or use paprika for less heat
  • ⅛ teaspoon black pepper
  • ½ teaspoon salt
  • Generous pinch of hing asafetida, optional, or use 1 clove of garlic and add with ginger
  • ½ teaspoon dried fenugreek leaves, omit if you don’t have them
  • 2 teaspoons lemon juice
  • ¼ cup (4 g) chopped cilantro

Method

  1. Boil, peel and cube your potatoes, if you haven’t already and set aside. see notes
  2. Head a skillet over medium heat, add the oil. Once the oil is hot, add the cumin seeds and toast until they have significantly changed color and are very fragrant. Then add the green chilies and mix in, then add the ginger and mix in.
  3. Then after a few seconds add all the ground spices and salt and mix in. Add the cubed potatoes and toss well to coat. Add the lemon juice and fenugreek leaves and mix in well and cover the pan with a lid and let it cook for 1-2 minutes to let the spices infuse and coat the potatoes.
  4. Uncover, add cilantro, mix well and take off heat.
  5. Serve as is or as your breakfast potatoes or as a side with indian food or add to wraps or sandwiches. Or serve as a Chaat snack topped with onion, tomatoes and cilantro chutney or lemon juice

Enjoy!

Love,

TVCL xx

Recipe Sunday – German Chocolate Cake Energy Bites

Hello beauties! How are you? Here, we’re still enjoying some cold, sunny days and yesterday I tried to fit a whirly (rotary washing line) in the garden – I say “tried” because the pole is now in the ground but the mixture hasn’t solidified too well on the surface although the pole itself is not moving, so hopefully, it will be all set for the next washing! But today, I have done nothing, just took it easy, done a long yoga session this morning then almost finished a book and watched a couple of episodes of Schitt’s Creek. I know this might not be the best way to cope with it, but the next three weeks are going to be so busy (a christening, working three Saturdays in a row, taekwondo pre-grading, seeing a couple of friends, a medical appointment) and I am making the list of all the things I’ll have to do thinking that by doing this I’ll be prepared, however, it dawned on me that I’m just making myself more anxious and instead I should just “go with the flow”. Who knows how my brain works. But surely, I will need all the possible energy so I am going to make these German Chocolate Cake Energy Bites by the MinimalistBaker to assist me.

German Chocolate Cake Energy Bites by the MinimalistBaker

Ingredients

  • 1 ¼ cup raw pecans
  • 2/3 cup unsweetened shredded coconut
  • 3/4 cup packed pitted dates (measured after pitting // medjool are best)
  • 1/4 cup cacao powder or unsweetened cocoa powder
  • 1/4 tsp vanilla extract
  • 1/4 tsp sea salt
  • 2 Tbsp creamy almond butter (or other nut or seed butter)

“FROSTING”

  • 1/3 cup dairy-free semi-sweet chocolate chips
  • 1/2 tsp coconut oil

Method

  1. Preheat oven to 350 degrees F (176 C). Add pecans to a bare baking sheet and toast for 7 minutes. Then add coconut and toast both together for 2-5 minutes until fragrant and lightly browned, watching closely and tossing/stirring after 2 minutes to ensure even cooking. Remove from the oven and let cool slightly. Transfer to a food processor and pulse a few times until no large pieces of pecans remain (see photo). In a small bowl, reserve 1/4 cup (30 g) toasted pecans and coconut for coating the exterior of the bites (adjust amount if altering the default number of servings).
  2. Pulse the remaining pecans and coconut into a fine meal, then add pitted dates, cacao or cocoa powder, vanilla, salt, and almond butter. Pulse until the mixture is broken down and crumbly — we like to stop before it becomes completely dough-like so that the bites maintain some texture. It should stick together when pressed between two fingers; if still dry and crumbly, continue processing until it is sticky enough to form into a ball. If too dry, you can add a bit more almond butter — we didn’t need any extra, though.
  3. Scoop out 1 ½ -Tbsp amounts and roll into balls. If making the default number of servings, there should be ~14 balls. Place them on a parchment-lined plate.
  4. “FROSTING”: To a small glass or metal bowl, add chocolate chips and coconut oil. Carefully place the bowl on top of a saucepan of simmering water. Heat, stirring occasionally with a spatula or spoon, until melted and no lumps remain — ~5 minutes. You can also melt the chocolate and oil in a heat-proof bowl in the microwave in 20-second increments until melted. Remove chocolate mixture from heat.
  5. Drizzle the melted chocolate mixture over the bites, then sprinkle with the reserved pecans and coconut before the chocolate hardens. Enjoy right away or transfer to the fridge until the chocolate has set – about 10-15 minutes.

Love,

TVCL xx

Recipe Sunday – Vegan Chocolate Peanut Butter Eggs

Happy Sunday, beautiful cats! I hope you’re having a nice weekend. To be honest, I am enjoying this stormy weather – while walking back from work yesterday, the wind was pushing me a bit and made for a fun walk. And this morning, I spent some time in the garden, with the clouds going so fast in the sky, and I sat reading a book (“Just Another Missing Person” by Gillian McAllister) and drinking my Matcha and Moringa Latte (my own special recipe that I make every Sunday) in the garden. It was very peaceful and the perfect way to start the Sunday.

However, it was during the week that I made something easy and quick and delicious: as I had a short week (what with Easter Monday and Wednesday was my day off) and still felt a bit in holiday mood, I found the recipe for Vegan Chocolate Peanut Butter Eggs by ItDoesntTasteLikeChicken that was just right for a treat for the week (you know when you would like something sweet after dinner, and want it to be satisfying and at the same time not junk food? this is it!).

Vegan Chocolate Peanut Butter Eggs by ItDoesntTasteLikeChicken

Ingredients 

  • ½ cup natural peanut butter
  • ¼ cup powdered sugar
  • ½ teaspoon vanilla extract
  • ¼ teaspoon salt
  • 1 ¼ cups (8.6oz / 245g) vegan chocolate chips

Method 

  1. In a medium bowl mix together the peanut butter, powdered sugar, vanilla extract, and salt to form a dough. The dough should be easy to roll into a ball. If the dough is too dry, add a touch more natural peanut butter. If the dough is too wet add a bit more powdered sugar until you reach the correct texture.
  2. Line a large baking sheet with parchment paper. Take about 1 tablespoon of the peanut butter dough and roll it into a ball. Flatten the ball to about ½ inch thick, use your fingers to pinch it into an egg shape, and then place it on the prepared baking sheet. Repeat with the remaining peanut butter dough to make about 9 peanut butter eggs. Freeze for 30 minutes (or as long as overnight).
  3. Melt the chocolate chips in the microwave in 20-second increments, stopping to stir, and being careful to not burn the chocolate. Alternatively, you can melt the chocolate in a double boiler.
  4. Remove one peanut butter egg from the freezer at a time (they soften very quickly), and use a fork to dip the frozen peanut butter egg into the chocolate, evenly coating it. Let excess chocolate drip off then place it back on the parchment paper-lined tray in the freezer, or on a second tray if preferred. Repeat with all the eggs. If you have leftover chocolate, you can return the chocolate to the microwave to make sure it is melty, then use a fork to drizzle extra chocolate over the eggs for decoration. Chill the eggs in the freezer for 30 minutes or until the chocolate is set. Peel off the paper and enjoy.

I hope you’ll love them as much as I do!

Love,

TVCL xx

Recipe Sunday – Vegan Colcannon Recipe (plus an extra one!)

Hi beauties! How are you? Last week I didn’t manage to write anything – I have a poor two poor excuses for it: it was my Aunty’s birthday and I was really tired from the past week as it had been quite busy between work and trying to have a social life (I went to the hairdresser and then to the opera to see the Carmen with a friend!).

This week has been another busy week and also yesterday was my third Saturday working in a row. Quite tiring. And I also got the umpteenth cold – I am working myself up too much and the Spring doesn’t help.

However, here I am with two recipes, the first one is the Vegan Colcannon by TheEdgyVeg, obviously made last Sunday. Candace is by far in my top 3 favourite YouTubers/bloggers and I enjoy making all her recipes. This one is so delicious, quick and easy, that I am definitely going to make it more than once a year!

Vegan Colcannon by TheEdgyVeg

Ingredients

  • 1½ cups chopped kale, packed
  • 1½ cups chopped green cabbage, packed
  • 4 russet potatoes, peeled and (large) cubed
  • ¼ cup vegan butter or margarine
  • ½-1 cup unsweetened soy milk, warmed
  • 3green onions, chopped
  • ¼ cup chopped parsley (optional)
  • sea salt & pepper

Method

  1. Bring a medium-sized pot of water to a boil.
  2. Next, add chopped cabbage and kale into boiling water and blanch for 1-2 mins, or until bright green in colour. Remove greens with a slotted spoon, and place immediately into an ice water bath.
  3. Next, add your peeled and cubed potatoes and 1½ tsp salt to the same pot of water you cooked the greens in, and bring to a boil. Cover, reduce heat and simmer the potatoes for roughly 15-20 mins, or until tender. When it’s fork tender, drain potatoes and add them back into the pot.
  4. Add vegan butter or margarine, and allow it to melt. Using a potato masher, mash the potatoes until smooth and butter is combined.
  5. Gradually, add warmed soy milk, stirring. Season with salt & pepper to taste.
  6. Add your cabbage and/or kale and stir again to combine.
  7. Serve garnished with additional green onions and/or parsley.

Extra recipe!

The extra recipe is because I also made these during the week and while they didn’t come out as the commercially available Jimmy Dodgers (I didn’t use caster sugar and I am not used to cream) they came out really nice and had them for breakfast as well as for snacks. So here is the recipe for Vegan Jammie Dodger recipe by WallflowerKitchen.

Vegan Jammie Dodger recipe by WallflowerKitchen

Ingredients

  • 120 g / ½ cup vegan butter (suggested Vitalite dairy-free spread)
  • 55 g / ¼ cup caster sugar
  • 180 g / 1 ½ cups plain flour
  • Seedless raspberry jam

Method

  1. In a large bowl, cream together the vegan butter and sugar until smooth.
  2. Add the flour in a small amount at a time and continue to mix the dough until completely smooth and it balls together. If it’s still crumbly, keep mixing.
  3. Briefly kneed the dough and roll into a smooth ball. Wrap in clingfilm and chill in the fridge for 20-30 minutes.
  4. Meanwhile, preheat the oven to 180C / 370F and line a baking sheet with greaseproof paper.
  5. Once the dough has chilled, roll to about ½ cm thickness and cut out your cookie shapes. Use a smaller cutter to make a cut-out centre on half of the cookies.
  6. Transfer to the baking sheet and bake for 10-15 minutes, turning occasionally to ensure even baking. Once they begin to turn slightly golden brown at the edges, they are done.
  7. Leave to cool at room temperature.
  8. Once cooled, add approximately half a tsp of the raspberry jam to each full halves of the cookies and place the cut-out centre cookies on top to create a jam sandwich.

Enjoy!

Love,

TVCL xxx

Recipe Sunday – Pear Almond Torte Tatin

Hello beauties! How are you today? Here we can’t complain – I was speaking at an online conference for International Women’s Day and I had been very nervous for the past few weeks: I was very excited about the invitation and also about sharing my research. But I am not good at all at public speaking, like that’s not my skill. However, I have also been invited to give a workshop with a colleague at an in-person conference in June. So I thought that if I can manage this online one, it will be good prep for the in-person one. Also, at this past online conference I prepared the presentation, I rehearsed it and it was an excellent chance for me to share my research project and my findings.

And you know what? I nailed it! Two of my colleagues were following the event and they both came after my talk to tell me that I did very well, they learned new things and also they gave a hug! The attendees at the conference left many lovely positive comments and one person also suggested that they can help progressing my research. I won’t lie: I was DRAINED after the event, but couldn’t stop because I had another event I had to attend with a colleague (that also went well!). Yesterday I was working too, so such a busy week!

And you know me, even if I’m busy I want something tasty, some kind of comfort food and it has to be easy and quick. I was so lucky to stumble upon this recipe for a Pear Almond Torte Tatin by Miyoko Schinner. I am not a fan of pears, but oh goodness this is such a great recipe! (Also, now the Pear Galette, my go-to recipe with pears, has some competition!)

Pear Almond Torte Tatin by Miyoko Schinner

Ingredients

  • 3-4 pears, sliced
  • 2/3 cup of brown sugar (plus 3-4 tablespoons for the caramelization)
  • 1/2 cup Extra Virgin Olive Oil (plus 2 tablespoons for the caramelization)
  • 1 cup all-purpose flour
  • 3/4 cup almond flour
  • 1 cup almond milk
  • 1 teaspoon vanilla extract
  • 1 tablespoon baking powder

Method

  1. Preheat the oven to 350F/180C;
  2. Prepare an 8-9 in cake pan with a sheet of parchment paper at the bottom;
  3. Brush the 2 tablespoons of olive oil on the paper and sprinkle the 3-4 tablespoons of brown sugar (this will help with caramelization);
  4. Put the pears now: you can fan them out or just set them there without much attention (the fanning will make the end result prettier, but to be honest I just threw them there) and set aside;
  5. Put the half cup of oil with the 2/3 cup of sugar and stir;
  6. Sift the flour with the baking powder then add the almond flour;
  7. Add half of the flour mixture to the oil mixture and stir;
  8. Then add half the milk and whisk well;
  9. Add the rest of the milk and the rest of the flour;
  10. Add the vanilla extract;
  11. Pour the batter over the pears and we’re going to put it in the oven for 25-30 minutes.
  12. Check with a toothpick if it comes out clean. Flip it upside down and let cool.
  13. Enjoy!

Love,

TVCL xx

Recipe Sunday – Roasted Cabbage Steaks

Happy Sunday, cats! How was your week? Here, it has been another fairly busy week, and I am also preparing to speak at an online conference next week (no pressure!). We’re also going to host an event for International Women’s Day on Friday afternoon – so, plenty to do! I haven’t been feeling like trying new recipes, but while I was making my cabbage soup for the weekend, I noticed I had a lot of cabbage so that’s when I decided to try the Roasted Cabbage Steaks by EatSomethingVegan. They didn’t disappoint! Extremely easy to make and a great result. Definitely will make it again, maybe with some basmati rice and a tempeh roast. Will let you know!

Roasted Cabbage Steaks by EatSomethingVegan

Ingredients

  • 2 small cabbage heads
  • 3 tbsp. olive oil
  • ½ tsp. salt or to taste
  • 2 tsp. paprika
  • 1 tbsp. garlic powder

Method

  1. Cut the stems off the cabbage heads and then cut each one in half, then in half again. You should have four flat discs of cabbage that are about ¾ to 1 inch thick from each head. Place the cabbage steaks on a baking sheet that is lined with parchment paper, allowing some space between each one to even cooking.
  2. Brush the cabbage with the olive oil, coating them thoroughly. Then generously sprinkle the salt, garlic powder, and paprika on the cabbage steaks. Flip the cabbage over and repeat, brushing them with oil and sprinkling the seasonings. Then add a pinch of red pepper flakes to each one, if desired.
  3. Bake the cabbage steaks at 400°F for about 25 minutes, until the leaves are browned and the center is tender. Serve hot out of the oven and enjoy!

Love,

TVCL xx

Recipe Sunday – Vegan Orange and Olive Oil Cake

Happy Sunday my kittens, I hope you are well! It’s been a long week and I’m just back from a lovely afternoon: my partner’s sister organised a fundraiser for Palestine, so many lovely people brought delicious food (mostly vegan!) and there were also 2 Palestinian women. It was a great atmosphere despite the horrors that are currently happening in the Middle East, but it showed that many people are not supporting said horrors. Please keep reading about it, and keep talking about it because while you might think that this is something that doesn’t touch you, it actually does, it involves all humans.

Having said this, I wanted to share with you this Vegan Orange and Olive Oil Cake by ConnoiseurusVeg that I just made and it’s one of the easiest and quickest desserts ever! So here is the recipe.

Vegan Orange and Olive Oil Cake by ConnoiseurusVeg

Ingredients

  • ½ cup olive oil
  • ⅓ cup orange juice
  • ⅓ cup unflavored and unsweetened non-dairy milk
  • 1 tablespoon orange zest
  • 1 teaspoon vanilla extract
  • 1 ¾ cup all-purpose flour
  • 1 cup organic granulated sugar
  • 1 teaspoon baking powder
  • ½ teaspoon baking soda
  • ½ teaspoon salt
  • Organic powdered sugar, for serving (optional)

Method

  1. Preheat the oven to 350°F.
  2. Lightly oil and flour the bottom of a 9-inch round cake pan.
  3. In a small container such as a liquid measuring cup, stir together the olive oil, orange juice, milk, orange zest, and vanilla.
  4. Whisk the flour, sugar, baking powder, baking soda, and salt together in a large mixing bowl.
  5. Pour the liquid mixture into the bowl with the dry ingredients and stir the batter until almost all of the lumps are out. It doesn’t need to be perfectly smooth.
  6. Pour the batter into the prepared cake pan.
  7. Bake the cake for about 25 minutes, until a toothpick inserted into the center comes out clean.
  8. Place the pan on a cooling rack and let the cake cool completely.
  9. Once the cake is cool, carefully invert it onto a plate.
  10. Optionally sprinkle the cake with powdered sugar. Slice and serve. (I omitted the sugar)

Enjoy!

Love,

TVCL xx

Recipe Sunday – Spicy Eggplant Pasta

Hi my beautiful cats! I hope you are well. Recently, I haven’t been much active here and there are many reasons:

  • Since December, I’ve had an on-and-off cold: it seemed I got rid of it 2 weeks ago, but it came back with a vengeance. Definitely, it doesn’t help that at work we are still without heating and we are passing these bugs around with my colleagues, like playing tennis with the cold;
  • Despite taking all of my “concoctions” (from tea with turmeric and black pepper, to oregano oil and apple cider vinegar) I can’t quite shake this cold off and I am currently on day 4 of antibiotics – before this, I hadn’t needed antibiotics, for years;
  • I have let the current world events deteriorate my mental health: I am struggling to understand the people defending the criminal actions of the Israeli government and I am really losing hope in the human species. All the NATO/Russia is also not helping.

However, here I am today with some comfort food – I had a single eggplant waiting to be used in the fridge and this Spicy Eggplant Pasta by ConnoisseurusVeg was exactly what I needed.

Spicy Eggplant Pasta by ConnoisseurusVeg

Ingredients

  • 8 ounces dried rigatoni pasta
  • 3 tablespoons olive oil, plus more if needed, divided
  • 1 medium (1 pound or 450 gram) eggplant, salted if necessary, cut into ½ inch cubes
  • 1 medium onion, diced
  • 5 garlic cloves, minced
  • 1 (14 ounce or 400 gram) can diced tomatoes
  • 1 cup canned crushed tomatoes
  • 3 tablespoons capers
  • 1 teaspoon crushed red pepper flakes, or to taste
  • ½ teaspoon salt, plus more to taste
  • ½ cup chopped fresh basil, plus more for serving, optional
  • ¼ cup chopped fresh parsley, plus more for serving, optional
  • Black pepper to taste

Instructions

  1. Bring a large pot of salted water to a boil. Add the pasta and cook it according to the package directions, until al dente. Drain the pasta into a colander when it’s finished cooking.
  2. While the pasta cooks, coat the bottom of a large skillet with 2 tablespoons of olive oil and place it over medium heat. Once the oil is hot, add the diced eggplant in an even layer. (Notes 1 and 2)
  3. Cook the eggplant for about 10 minutes, flipping the pieces only once or twice, until they’re browned on multiple sides.
  4. Remove the eggplant from the skillet and transfer it to a plate when it’s finished browning.
  5. While the eggplant cooks, coat the bottom of a large pot or skillet with the remaining 1 tablespoon of olive oil and place it over medium heat.
  6. When the oil is hot, add the onion. Sweat the onion for about 5 minutes, until soft and translucent, stirring frequently.
  7. Add the garlic and cook for 1 minute more, until very fragrant.
  8. Stir in the diced tomatoes, crushed tomatoes, capers, red pepper flakes, and ½ teaspoon of salt.
  9. Bring the sauce to a simmer, and allow it to cook, uncovered, for about 10 minutes, until it thickens up a bit. You can add a splash of water if it becomes too thick.
  10. Stir the eggplant into the sauce and let the mixture simmer for about 5 minutes more, until the sauce very thick and the eggplant is very tender.
  11. Add the cooked pasta, parsley and basil to the sauce and stir everything well to distribute the ingredients and wilt the herbs.
  12. Remove the pot from heat and season the pasta with additional salt and black pepper to taste.
  13. Divide onto plates and serve. Sprinkle with additional parsley and basil, if desired.

Enjoy!

Love,

TVCL xx

Recipe Sunday – 5 Ingredient Vegan Baked Mac and Cheese

Happy Sunday, dear cats! How has the past week treated you? Here it has been really cold: you know me, I love the cold, but the heating has stopped working in my library and it’s been really cold inside – luckily, we have quite a few portable electric heaters and we are allowed to wear hats, gloves, extra layers and have a bit more tea breaks to keep us warm. The price to repair the system is probably going to be too much for the current financial situation and this is causing stress and anxiety to my colleagues and me. It has been a long week and the whole affair just calls for some serious comfort food and what’s better than a Mac and Cheese? This 5 Ingredient Vegan Baked Mac and Cheese by TheBananaDiaries is a nice, easy, and quick recipe that will lift the spirit of anyone who eats it. Trust me! Also, I would suggest adding 1 tablespoon of mustard to the cheese sauce, I’ve tried it once and now I am adding it in most of the white sauces.

5 Ingredient Vegan Baked Mac and Cheese by TheBananaDiaries

Ingredients

  • 16 ounces macaroni pasta
  • 480 ml unsweetened dairy free milk (oat milk recommended), room temperature
  • 8 ounces shredded vegan cheddar cheese
  • 8 ounces shredded vegan mozzarella cheese
  • 5 tbsp oat flour
  • 66 grams salted vegan butter
  • Optional: 2 tbsp plain pea protein

Vegan Gluten Free “Breadcrumbs:”

  • 45 grams rolled oats, ground into flour
  • 66 grams salted vegan butter, melted
  • 1 tsp dried rosemary
  • 1 tsp dried thyme
  • 1/4 tsp nutmeg

Instructions

  1. Preheat the oven to 400F. Grease a large casserole dish with olive or cooking oil and set aside. Measure out all ingredients before beginning.
  2. Bring a large pot of water to a boil. Add in the macaroni pasta, and cook until al dente, about 7 minutes. Drain the pasta and set aside. Reserve 1/4 cup of pasta water. While the pasta is cooking, you’ll make the vegan cheese sauce.
  3. In a medium pot, heat the vegan butter until melted, then add in the oat flour. Whisk for 2-3 minutes, until the mixture thickens. Then add in the dairy free milk, along with the reserved pasta water, and whisk until combined. Allow the mixture to begin to boil then reduce the heat to medium. Add in the vegan cheeses, and whisk together on medium-low heat until the vegan cheese has completely melted into the milk mixture. This should be about 4-5 minutes. (this is where I added the tablespoon of mustard).
  4. Stir the pasta into the cheese sauce until evenly coated. Then spoon the mac and cheese into the casserole dish and set aside as you make the breadcrumbs.
  5. Combine the oat flour with the rosemary, thyme, and nutmeg. Whisk in the melted vegan butter, then sprinkle the oats over the mac and cheese.
  6. Place the casserole dish into the oven to bake for 15-18 minutes, or until the breadcrumbs are lightly browned. Turn the broiler on for the remaining 2 minutes of baking to evenly brown the breadcrumbs.
  7. Remove the mac and cheese from the oven, and allow it to cool for 10 minutes before serving and enjoy!

Love,

TVCL xx

Recipe Sunday – 1 Hour Vegan Cinnamon Rolls with Acquafaba

Happy Sunday, beautiful cats! How are you today? I hope you’re having a lovely weekend! Yesterday we started feeling some very cold weather and was happy to take out my winter boots so that I could enjoy a fresh and crisp walk to work: the view was beautiful with the clear blue sky over the hills, the light colours over the hills. For lunch, I had homemade baked mac and cheese, but more importantly, I had some delicious cinnamon rolls for breakfast. You know that I like easy and quick recipes so you might be surprised that I am sharing this with you, but listen, this is a recipe for a 1-Hour Vegan Cinnamon Rolls recipe by VeganRicha. I made it while I was cooking dinner – how great is that! So here it is.

1-Hour Vegan Cinnamon Rolls recipe by VeganRicha

Ingredients

Cinnamon Rolls:

  • 3/4 cup (187.5 ml) warm-hot water
  • 1/4 cup (59.15 ml) aquafaba chickpea brine, (or use room temp non-dairy yogurt or 1/4 cup coconut milk + 1.5 tbsp flax meal. Though the rolls do best with aquafaba)
  • 1 tbsp sugar or other sweetener
  • 1 tbsp maple syrup
  • 1 packet active yeast or 2 1/2 tsp active yeast
  • 2 tbsp oil or use melted vegan butter. I usually use oil
  • 1 tsp nutritional yeast (optional)
  • 2.5 cups (312.5 g) or more flour I use unbleached white or a combination of white and wheat flour
  • 1/3 tsp (0.33 tsp) salt

Filling:

  • 1 to 2 tbsp Oil or melted vegan butter
  • 1/3 cup (53.33 g) or more coconut sugar or brown sugar
  • 2 to 3 tsp cinnamon
  • 1/4 tsp (0.25 tsp) salt
  • Add some cardamom or nutmeg for variation

Instructions

  1. Preheat the oven to 350 degrees F / 180ºc. Line a 8 by 8 inch brownie pan or 9 inch pie pan with parchment. Mix the first 5 ingredients under rolls until the sugar is mixed in. Let sit for a minute for the yeast to activate.
  2. Add in the oil, nutritional yeast and mix in. Add 2 cups flour and salt and knead. Add more flour, few tbsps at a time to make a soft somewhat smooth dough. 4 to 6 mins.
  3. Roll the dough out using additional flour into a 10 by 14 inch rectangle
  4. Spray or brush oil or vegan butter on the rolled out dough. (use as much melted vegan butter as you like :)).Sprinkle sugar, cinnamon and salt evenly. Roll the dough tightly along the longer edge to make a cylinder.
  5. Slice using a pizza cutter or floss or a serrated knife. Place the slices in a parchment lined brownie baking pan or pie pan. Spray or brush oil on top. Cover lightly with a towel and Let the pan sit near the warm oven for 15 to 20 minutes or until just about doubled. Remove the towel.
  6. Bake at 350f / 180ºc for 21 to 23 minutes or until golden on some edges.(just about starting to get golden)
  7. Let the rolls sit for a few minutes, while you make the icing or frosting of choice. Frost and serve.

Enjoy!

Love,

TVCL xx