Recipe Sunday – Hot Cocoa Cookies

Happy Sunday, my beauties! You might have seen that last week I shared some December Affirmations, just some words or phrases to give you a bit of respite from not only the Holidays madness, but also to give our minds some rest from what is happening (and it has been going on for more than 2 months in Gaza). I hope that seeing these words is helping you cope, even just a little bit better.

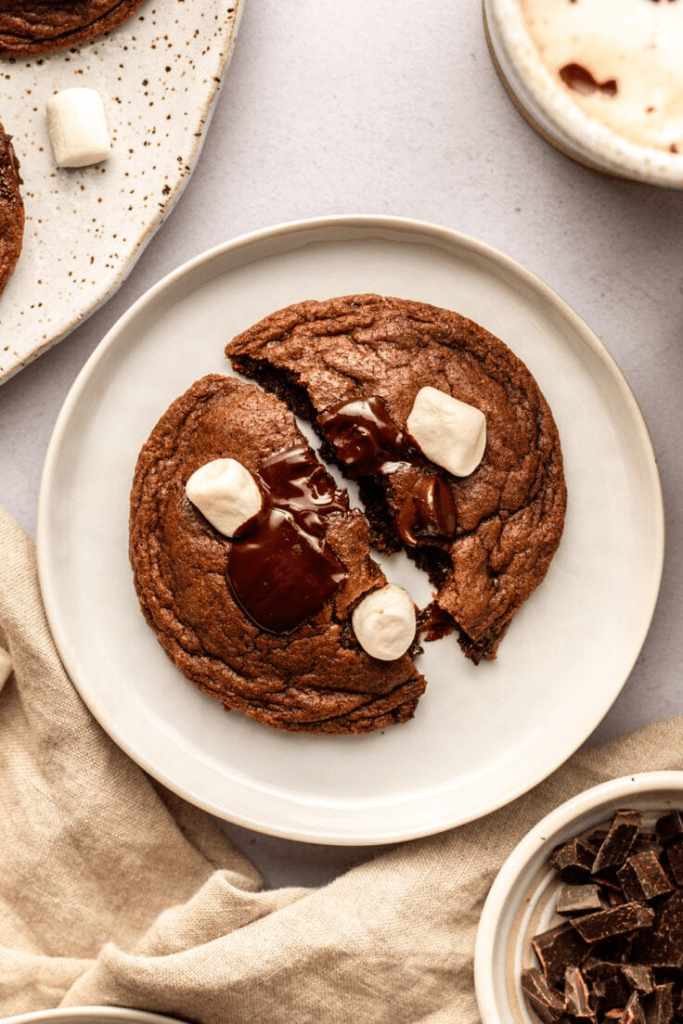
If you are like me, all this just makes you seek more comfort food (as it was clear from last week’s Recipe Sunday, with the very decadent Mac and Cheese!). So I’m here to rescue you with these Hot Cocoa Cookies by FromMyBowl – decidedly easy and quick to whip up, with a delicious result (you’ll have to make a double batch of these because they’re sooo good!).

Hot Cocoa Cookies by FromMyBowl

Ingredients

  • 1 tablespoon ground flaxseed
  • 2 1/2 tablespoons water
  • 1/2 cup vegan butter softened to room temperature
  • ½ cup cane sugar
  • ½ cup packed brown sugar
  • 1 teaspoon vanilla extract
  • 1 1/4 cup all-purpose flour
  • 1/4 cup cocoa powder
  • 2 teaspoons cornstarch
  • 1/2 teaspoon baking soda
  • 1/4 teaspoon salt
  • 3/4 cup chopped chocolate bar or chocolate chips divided
  • 1/2 cup plant-based mini marshmallows* (about 3-4 per cookie)

Instructions

  1. Preheat the oven to 350F and grease or line a baking sheet with parchment paper. Combine the ground flax with the water in a small bowl and mix well; let sit for 5 minutes, to thicken.
  2. Add the butter, brown sugar, and cane sugar to a large bowl and use a hand mixer (or bowl of a stand mixer) to cream them together until smooth, 2 to 3 minutes. Add the thickened flax seed and vanilla to the butter mixture. Mix again until combined.
  3. Add the flour to the mixing bowl and sift the cocoa powder on top to prevent clumps. Add in cornstarch, baking soda, and salt to the bowl and mix well with a spatula. Add 1/2 cup of the chopped chocolate to the bowl and fold into the dough.
  4. Divide the dough into 12 equal balls, roughly 3 tablespoons each. Place each cookie dough ball 2” apart on the baking sheet, then top with the remaining 1/4 cup of chocolate, pressing it into the top of the ball slightly so it sticks. Do not flatten the cookies on the baking sheet as they will spread when they cook.
  5. Bake for 7 minutes, until the cookies have spread and are puffy. Remove the cookies from the oven and quickly press in 3-4 mini marshmallows per cookie; it’s ok if they flatten slightly as you decorate. Return the cookies to the oven and bake for an additional 2 minutes, to set the marshmallows.
  6. Remove the cookies from the oven and let sit on the baking sheet for 10 to 15 minutes, to allow them to set. Use a spatula to transfer the cookies to a wire rack and let them cool completely (or enjoy warm!)
  7. Let the chocolate fully cool and solidify before storing. Store cookies in an airtight container at room temperature for up to 4 days, or in the freezer for up to one month.

I hope you’ll enjoy them!

Love,

TVCL xx

Recipe Sunday – Quick and Easy Miso Noodles

Hello kittens! I hope you’re having a nice weekend and managed to get at least 5 minutes to do something for yourself – we’re getting into one of the busiest times of the year, we just left Halloween and preparing for Christmas (and for the U.S. cats, Thanksgiving too!). Yesterday, my town had the first Christmas event of the season and it was so crowded! Plenty of lovely handmade stuff, though, from candles, soaps, and gin (!!!). Also, I had another Taek-Won-DO pre-grading, now going for a blue belt red tag! In addition to this, with my partner, we went to his brother’s birthday dinner: always lovely to see his family but at the end of the day I was happy to go to bed. And I won’t have a free Saturday until next year. I’m already tired.

Anyway, here is a recipe that has it in the name our favourite characteristics: Quick and Easy Miso Noodles by RunningOnRealFood.

Quick and Easy Miso Noodles by RunningOnRealFood

Ingredients

For the Miso Sauce

  • 2 tbsp white miso
  • 2 tbsp tahini or peanut butter
  • 2 tbsp maple syrup
  • 2 tbsp tamari
  • 2 tbsp sesame oil
  • 1 tbsp rice vinegar
  • 2 tsp chili-garlic sauce (sambal oelek or Sriracha)
  • 4 cloves garlic, grated
  • ⅓ cup warm water

For the Noodles & Vegetables

  • 250 g dry wheat noodles (Chinese-style lo mein), soba or ramen
  • 3 cups green cabbage, chopped
  • 3 cups sliced mixed mushrooms
  • 1 small white onion, thinly sliced
  • 1 bunch green onions, thinly sliced
  • Optional: 250 g tempeh or tofu, cut into small cubes
  • 1 tbsp tamari

Garnishes

  • green onions, thinly sliced
  • sesame seeds
  • toasted nori, thinly cut 

Instructions

  1. Make the Miso Sauce: Add all sauce ingredients to a medium bowl. Stir until smooth. Set aside.
  2. Cook the Noodles: Prepare noodles according to package directions. Once tender, drain and set aside.
  3. Cook Tofu or Tempeh (Optional): If using tempeh or tofu, heat 1 tbsp oil in a large pan, over medium-high heat. When the pan is hot, add the tempeh or tofu cubes. Cook for 6-8 min, breaking apart into smaller pieces, until golden-brown.  Remove the pan from the heat, then drizzle over 1 tbsp tamari. Toss to combine. Transfer to a plate and set aside. 
  4. Stir Fry the Veggies: Heat 2 tsp oil over medium-high heat.  Add the mushrooms, cabbage and onions. Season with a pinch of salt and pepper. Cook for 4-6 min, stirring occasionally, until tender. Add green onions, reserving some for serving. Cook for another 2-3 min, stirring often, until tender-crisp.
  5. Add Noodles & Sauce: To the pan, add drained noodles and miso sauce.  Cook for 1-2 min, tossing gently, to coat noodles in sauce. 
  6. For Serving: Divide noodles between bowls.  Top with tempeh (if using), green onions, sesame seeds and toasted nori. Drizzle more chili-garlic sauce over top, if desired.

I hope you’ll enjoy it!

Love,

TVCL xx

Recipe Sunday – Almond Flour Cookies

Hey, cats! How are you these days? Here it’s been a good week – I was working yesterday but I went to deliver a course in one of the nearby libraries and it’s always a pleasure going there, the drive there is very scenic and yesterday could have not been a better day to go as it was a cold, clear-skyed day, with all the autumnal colours around! Really a beautiful view that made my day, one of those views that recharge the spirit. When I came back I felt energised and managed to do quite a lot of things – feeling very positive. And these Almond Flour Cookies by ElaVegan were just what I needed for this lovely day!

Almond Flour Cookies by ElaVegan

Ingredients 

  • 1 cup (100 g) almond flour
  • 1/2 tsp baking powder
  • 4 Tbsp (40 g) date sugar (or sugar of choice)
  • 1/4 cup (64 g) almond butter softened (see notes)
  • 1 Tbsp water
  • 1/4 cup (45 g) dairy-free chocolate chips

Method 

  1. First, preheat the oven to 350°F (175°C) and line a cookie sheet with parchment paper.
  2. Then, mix the almond flour, baking powder, and sugar in a medium bowl (or a food processor) until there are no lumps.
  3. Add the almond butter (or nut/seed butter of your choice) and mix well. If the dough is dry, which it likely will be, add a tablespoon of water and mix again.If it’s still too dry, add more water, a teaspoon at a time, mixing thoroughly in between.
  4. Fold in the chocolate chips, reserving a few for the top, then use a small ice cream or cookie scoop or tablespoon to divide the dough into 6 cookies.
  5. Spread the cookies across the prepared baking sheet with space in between, using your fingers to flatten them gently, and press the reserved chocolate chips into the top.
  6. Bake the cookies for 11-12 minutes until they’re lightly browning on the edges. They will be soft right out of the oven, but firm up as they cool. Leave them to cool on a wire rack. Enjoy!

I hoe you’ll enjoy them!

Love,

TVCL x

Recipe Sunday – Creamy Vegan Noodle Casserole

Hi beautiful cats! How are you? Are you enjoying your weekend? Last week, I finished the macrobiotic detox, but I keep making miso soup and drinking kukicha tea just to keep me right. However, I am also reintroducing the food that I couldn’t eat during the detox, i.e. pasta. And this Creamy Vegan Noodle Casserole by ConnoiserusVeg is exactly what I needed! Easy and delicious with minimum effort – perfect for a weekday lunch.

Creamy Vegan Noodle Casserole by ConnoiserusVeg

Ingredients

  • 10 ounces dried rotini pasta (about 3 ½ cups of pasta)
  • ½ cup raw cashews, soaked in water 4 to 8 hours, drained and rinsed
  • 1 cup water
  • 3 tablespoons vegan butter, divided
  • 8 ounces button mushrooms, cleaned and sliced
  • 1 medium onion, diced
  • 2 medium celery stalks, diced
  • 2 medium carrots, diced
  • 2 garlic cloves, minced
  • 3 tablespoons all-purpose flour
  • 2 cups unflavored and unsweetened non-dairy milk
  • 3 vegetable bouillon cubes, crushed
  • 1 teaspoon dried thyme
  • 1 tablespoon lemon juice
  • ½ cup frozen peas, thawed
  • Salt and pepper, to taste
  • ½ cup panko breadcrumbs

Method

  1. Bring a large pot of salted water to a boil. Add the pasta and cook it according to the package directions. Drain the pasta into a colander when done.
  2. Place the cashews and water into a blender and blend until smooth. Set aside.
  3. Coat the bottom of a large skillet with two tablespoons of the vegan butter and place it over medium heat.
  4. When the butter has melted, add the mushroom slices in a relatively even layer.
  5. Cook the mushrooms for about 5 minutes on each side, until golden brown. Remove them from the skillet and transfer them to a plate when done.
  6. Add the remaining tablespoon of butter to the skillet. Once the butter melts, add the onion, celery, and carrots.
  7. Cook the veggies for about 5 minutes, stirring frequently, until they begin to soften.
  8. Add the garlic and flour. Stir the mixture well to coat the vegetables with flour and continue cooking the mixture for about 1 minute.
  9. Slowly begin adding the non-dairy milk, stirring in just a bit at a time to prevent the flour from clumping. Once all of the milk has been added, stir in the cashew mixture, bouillon, thyme, and cooked mushrooms.
  10. Raise the heat and bring the mixture to a low boil. Lower the heat and let it simmer for about 10 minutes, stirring frequently, until thickened slightly. Preheat the oven to 350°F while the sauce simmers.
  11. Remove the skillet from heat and stir in the lemon juice.
  12. Combine the cooked pasta, sauce mixture and peas in a 2-quart casserole dish.
  13. Season the mixture with salt and pepper to taste.
  14. Cover the casserole dish and place it into the oven. Bake the casserole for about 20 minutes, until heated throughout.
  15. Remove the foil from the dish and sprinkle the casserole with panko breadcrumbs. Bake 5 minutes more.
  16. Let the casserole sit out for 5 minutes before serving.

Enjoy!

Love,

TVCL x

Recipe Sunday – Chickpea Blondies

Happy Sunday beauties! How are you enjoying the autumn weather? Last night we changed the clock and I had just a long lie in this morning, I felt very rested and managed to do so many things! Also, I am coming to the end on my “Macrobiotic Detox” that I felt I could celebrate with a nice dessert which is still mostly Macrobiotic. In case you are interested, I am preparing a post explaining a bit the macrobiotic diet. In the meantime, I leave you today’s recipe: Chickpea Blondies by Rainbow Nourishments.

Chickpea Blondies by Rainbow Nourishments

Ingredients

  • ~1 ½ cups (250g) chickpeas, canned or fresh and drained well (I got this amount from one 15oz or 440g can)
  • ½ cup (125g) cashew butter, or nut/seed butter of choice
  • ½ cup (45g) oat flour,
  • ½ cup (170g) maple syrup
  • 2 teaspoons vanilla extract
  • 1 teaspoon baking soda
  • ⅛ teaspoon salt, or to taste
  • ½ cup (85g) mini dairy-free chocolate chips plus extra to decorate

Method

  1. Line an 8-inch square baking pan with parchment paper. Preheat your oven to 180°C (350°F).
  2. Add all the ingredients except the chocolate chips to a food processor or blender Blend until the mixture is as smooth as possible. It should be slightly runny.
  3. Remove the blade of your food processor. Add the chocolate chips and mix with a spoon or spatula. Make sure your blondie batter isn’t warm when you add the chocolate otherwise the chocolate will melt.
  4. Pour the batter into your prepared baking pan. Smooth the surface with a spoon or spatula. If desired, sprinkle additional chocolate chips on top of the batter and press them in.
  5. Bake the chickpea blondies for 23-28 minutes. The blondies are ready when they have puffed up and the surface is golden brown. If you insert a toothpick in the middle, it should come out clean (a few moist crumbs are fine but there shouldn’t be any wet batter).
  6. Place the square baking pan on a wire rack. Allow the blondies to cool completely in the baking pan for at least 1 hour. The blondies are very soft when they’re warm.
  7. When the blondies have completely cooled, remove them from the baking pan and cut them with a sharp knife. The blondies are very fudgy so it may help to run your knife under hot water before cutting them. If desired, sprinkle the blondies with flaky sea salt or enjoy with vegan ice cream.

Enjoy!

Love,

TVCL xx

Recipe Sunday – Vegan Victoria Sponge

Hiya my cats! And Happy Sunday! Last week was mental and I had an extremely busy weekend doing some more cleaning and tidying up, meaning that I wasn’t really able to sit down at my laptop for long. And while I had this week off, it was my birthday and my parents came to visit so I have been focused on spending time with them. Because between me being vegan and my mom being allergic to many various ingredients, I decided that I would make the birthday cake, or to be fair, cakes: I made a variation of the Pear Galette with Rooibos Glaze and also a Victoria Sponge by LazyCatKitchen. They both were a success with my parents! To make it more special, I used a homemade strawberry jam that a colleague made for my partner and me – delicious! So here is the recipe for this cake.

Vegan Victoria Sponge by LazyCatKitchen

INGREDIENTS

CAKE

  • 450 ml / 1½ cups + 2 tbsp soy milk*
  • 30 ml / 2 tbsp lemon juice
  • 150 g / ¾ cup softened coconut oil or vegan butter block
  • 300 g / 1½ cups sugar (coconut sugar for GF version)
  • 2 tsp vanilla extract
  • 1 tsp lemon extract (optional)
  • 430 g / 3½ cups AP flour or GF flour mix
  • 30 g / ¼ cup cornstarch/cornflour
  • ½ tsp xanthan gum (only if using GF flour)
  • 2½ tsp baking powder
  • ¾ tsp baking soda
  • ½ tsp salt

FILLING / TOPPING

  • 250 ml / 1 cup vegan whipped cream (like Oatly)
  • 2 tsp vanilla extract or paste
  • 2 tbsp icing sugar, to taste
  • 160 g / ½ cup quality strawberry jam
  • 500 g / 1 lb fresh strawberries

METHOD

  1. Heat up the oven to 180° C / 355° F (without the fan function) and grease and line two 20 cm / 8″ round cake tins.
  2. Combine soy milk and lemon juice in a small pot and warm up until just barely lukewarm. It will curdle – that’s what it is meant to do.
  3. Beat softened coconut oil (or vegan butter) and sugar with an electric mixer until nice and fluffy.
  4. Once whipped, fold in about a third of the lemon soy milk mixture and both extracts.
  5. Place a sieve over the bowl and sift in approximately a third of flour and all of the cornflour. Gently fold dry ingredients into the wet ingredients by making small circles in the middle of the bowl with your spoon to minimise lumps. It will take a while to incorporate well, don’t rush this step. Alternating dry and wet ingredients like this prevents the batter from being too runny to begin with and therefore lumps from forming.
  6. Next, fold in another third of soy milk, followed by another portion of sifted flour.
  7. Finally, add the last of the soy milk followed by both raising agents, salt and xanthan gum (for GF version) with your third batch of flour. Fold really gently so that you don’t knock too much air out of the batter.
  8. Divide the mixture between two tins and bake until a toothpick comes out clean of cake crumbs, about 30-32 minutes.
  9. Allow the cakes to cool down completely before removing from the tins and icing.

FILLING / TOPPING

  1. Whip chilled vegan whipping cream in a clean bowl according to the instructions on the packet. Add vanilla and a bit of sugar to taste.

ASSEMBLY

  1. Spread jam and cream on top of the first sponge cake, decorate with a few fresh strawberry halves.
  2. Top with the second sponge cake, decorate the top with more cream and strawberries or if you are after a more traditional look, simply sprinkle the top with some icing sugar.

I hope you’ll enjoy this cake, whether for your birthday or for another Sunday 🙂

Love,

TVCL xx

Recipe Sunday – Chocolate Almond Butter Chia Pudding

Happy Sunday, beautiful kittens! How are you? Are you enjoying your weekend? In some places of the UK, this is a holiday weekend, but alas, that’s not where I work so this is a normal weekend for me. Oh well, doesn’t really matter because I managed to have a lovely day yesterday with my partner (went to an artisan/farmers market in town and the vegan and cruelty-free products were almost everywhere!), then to the vegan cafe for a light lunch, a nice walk, made dinner and chilled watching The Last of Us (yes, we’re quite behind schedule in watching this series compared to the rest of the world). Today was another relaxing day, although I also managed to tidy up the place and throw away stuff that I don’t need and can’t be donated. Also, it happened! THE OVEN IS HERE! It arrived on Wednesday and I’m excited to try all the recipes that I’ve been saving for roasted veggies, baked goods etc. But today wasn’t the day: after all the tidying/cleaning I didn’t have any more energy to dive into a baking recipe. So I hereby present you with this recipe for a Chocolate Almond Butter Chia Pudding by AllTheHealthyThings.

Ingredients

  • ¼ cup  chia seeds
  • ½ cup almond milk
  • ½ cup canned coconut milk
  • 2 tablespoons cocoa powder
  • 2 tablespoons almond butter
  • 2 tablespoons maple syrup
  • 1 teaspoon vanilla extract
  • ¼ teaspoon cinnamon

Method

  1. Whisk together all of the ingredients except the chia seeds.
  2. Add the chia seeds and whisk again until well combined.
  3. Pour the mix into a glass storage container and place it in the refrigerator. After a few minutes, give it another stir to make sure everything is evenly combined.
  4. Leave the chia pudding in the fridge overnight. In the morning give it a good stir and then top it with fresh berries, your favorite granola, and nut butter.

Enjoy!

Love,

TVCL xx

Recipe Sunday – Double Chocolate Mug Cake

Hey lovely peeps! How are you enjoying this weekend? I was working yesterday and the week has just been mental, non-stop, 2 meetings to attend (one very interesting with potential for a big community project!) and 2 events – ooft, I would need a week to recover and not just one day (when will we go for a 4-day week instead of 5-day?!?). But I also managed to see a good friend for a beautiful foraging walk and helped a lot to recharge the spirit! And still no oven in the new place, but you know me and my sweet tooth so I am here to present you the perfect mug-cake recipe: Double Chocolate Mug Cake by PickUpLimes.

Double Chocolate Mug Cake by PickUpLimes

Ingredients

  • 2 Tbsp (17 g)all-purpose flour
  • 2 Tbsp (13 g) Dutch processed cocoa powder)
  • 2 Tbsp (28 g)granulated sugar
  • ¼ tsp baking powder
  • 1 pinch salt
  • 3 Tbsp (45 mL)unsweetened soy milk
  • 1 Tbsp (15 mL)vegetable oil
  • ¼ tsp pure vanilla extract
  • 0.7 oz (20 g) dairy-free dark chocolate

Optional toppings

  • fresh mixed berries
  • powdered sugar
  • vegan ice cream

Method

  1. In a large microwave-safe mug, mix together the flour, cocoa powder, sugar, baking powder, and salt.
  2. Then add the milk, oil, and vanilla. Mix until just combined. Be careful not to over-mix.
  3. Using your fingers, press half of the chocolate into the middle of the cake batter in your mug. This is so you have some melted chocolate in the centre of your cake (yum!). Add the other half of the chocolate to the top of the batter.
  4. Microwave on high (800 – 900 W) for 2 minutes*, or until a toothpick inserted into the centre comes out clean. If the cake isn’t cooked through yet, place it back in the microwave at intervals of 15 seconds.
  5. Let the mug cake cool slightly, add your desired toppings, and enjoy!

I hope you’ll enjoy this easy and quick recipe!

Love,

TVCL xx

Recipe Sunday – EASY Instant Pot Red Lentil Curry

Hello beauties! It’s been another manic week, there are so many things to do and time just flies! But I’m trying not to panic and my “word of the year” which is balance for me this year, is always with me. So, having nice, comforting food is a must especially in this time, and this Easy Instant Pot Red Lentil Curry by MyQuietKitchen is exactly what I need to get me through these busy days.

Easy Instant Pot Red Lentil Curry by MyQuietKitchen

Ingredients 

  • 1 large yellow onion, chopped
  • 4 to 6 cloves garlic, minced
  • 1 thumb size piece of fresh ginger, peeled and zested or minced
  • 1 (14 ounce) can light coconut milk
  • 1 (28 ounce) can diced tomatoes
  • 1 ¼ cups dry red lentils
  • 2 cups soy curls or 1 cup TVP
  • 1 heaping tablespoon mild curry powder
  • 1 teaspoon cumin
  • 1 tablespoon tamari (for GF) or soy sauce
  • 1 teaspoon fine sea salt
  • black pepper
  • 2 ¼ cups water

Method 

  1. Note: to avoid a burn warning on the Instant Pot it’s important to measure accurately and avoid major adjustments to the the wet/dry ratio.
  2. Combine all ingredients in the Instant Pot (onion – water), and stir very well. If using soy curls/TVP, these go in dry; no need to soak first. Lock on the lid, set to sealing, and cook on high pressure for 5 minutes.
  3. Carefully flip the toggle to manually release the pressure. Serve with rice or potatoes, a squeeze of lime juice, and fresh cilantro, if desired. Lentil curry is also great with a dollop of plain vegan yogurt.

I hope you’ll find this recipe as delicious as I do!

Love,

TVCL xx

Recipe Sunday – Blackened Tofu Tacos with Caramelized BBQ Onions

Hello beauties and Happy Sunday! How is it in your neck of the woods? Here it’s been another busy week, especially at work, it has been non-stop and have been on cat-feeding duties for my ex-neighbours for now two weeks. On top of it, I still have boxes to be unboxed, but I’m getting there and the oven should arrive in a couple of weeks! Also, next Thursday my parents will come to visit and while it will only be 4 days, I really can’t wait! So, loads of positives. As it has been so busy, I haven’t been cooking as much as I used to before the move but still want something flavourful and quick for my lunch on weekdays (I don’t want to make pasta all the time or sandwiches). These Blackened Tofu Tacos with Caramelized BBQ Onions by VeganRicha have saved me a lot of time and are just amazing!

Blackened Tofu Tacos with Caramelized BBQ Onions by VeganRicha

Ingredients

For the tofu:

  • 14 ounces (400 g) firm or extra firm tofu pressed for at least 15 minutes and cubed
  • 1 teaspoon soy sauce or use tamari for gluten-free
  • 1 teaspoon oil

For the blackening spice:

  • 2 teaspoons smoked paprika
  • 2 teaspoons onion powder
  • 1 teaspoon garlic powder
  • 1 teaspoon ground cumin
  • 1 teaspoon dried thyme
  • 1/2 teaspoon cayenne or chili powder blend
  • 1/2 teaspoon of salt
  • 1/2 teaspoon of black pepper

For the BBQ onion topping:

  • 1 teaspoon oil
  • 1/2 cup of onion
  • A good pinch of salt and pepper
  • 1 tablespoon BBQ sauce
  • 1 teaspoon hot sauce

For the rest of the tacos:

  • lime juice as needed
  • 2 cups of chopped lettuce or cabbage as needed
  • vegan ranch or vegan sour cream as needed
  • tortillas as needed Glutenfree as desired

Method

  1. Press and cube the tofu if you haven’t already. Then add to a bowl. Add the soy sauce and 1 teaspoon oil and toss well to coat.
  2. In another small shallow bowl, mix all the spices then sprinkle the spices over the tofu and toss well to coat.
  3. Heat a large skillet over medium-high heat.Add 2 teaspoons of oil and let the oil heat up then add in your spiced tofu.
  4. Cook for 7-10 minutes or until the tofu is golden, is crispy on most of the edges.
  5. You might want to be careful with the end of cooking so as to not burn the spices.
  6. Make the BBQ onions: Heat the oil in a medium skillet over medium heat. Add the onion and a pinch of salt and pepper and cook until the onion is golden. 7-8 mins. Stir occasionally.
  7. Then add in your BBQ sauce and hot sauce and toss well to coat then take off heat.
  8. To assemble tacos, warm your tortillas on a gas stove or a pan then layer a layer of lettuce. Add a good helping of the tofu.
  9. Squeeze some lime juice over the tofu then top it with the BBQ onions, more lettuce, and vegan ranch, or sour cream as needed.
  10. Repeat for all your tacos and serve immediately.

They are really delicious and I hope you’ll enjoy them as much as I did!

Love,

TVCL xx