Hi sweet cats! How are you? It’s been a full week and I’ve been feeling a bit low, but had a lovely day yesterday: I’ve done my Taekwondo grading and now I am a red belt, black tag, so it’s quite exciting! And then went with my boyfriend at his mum’s Secret Santa party: it was so relaxed and such good fun, with also a quiz (this would be a great idea to do with my family too!). Obviously, today I was done, but it was nevertheless a brilliant Saturday!
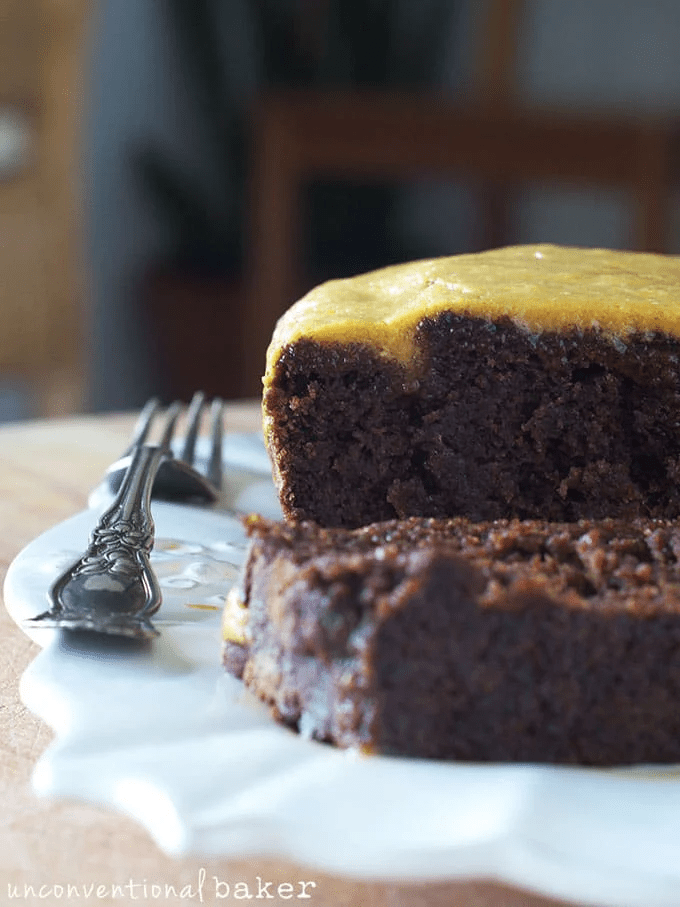
As you know, I like to have something sweet and I had some persimmons that were ripening quite quickly so I made this Gluten-Free Vegan Persimmon Chai Bread by TheUnconventionalBaker: while I am not too keen on persimmons as a fruit due to their consistency, I find they are perfect for a cake!
1 ½ cups persimmon puree (blend down roughly 3 small RIPE persimmons)
¼ cup olive oil (or another baking oil)
½ a ripe banana
1 cup maple syrup (or liquid sweetener of your choice)
1 tbsp pure vanilla extract
1 tsp cinnamon
½ tsp allspice
⅛ tsp nutmeg
⅛ tsp cloves
¼ tsp ground black pepper (no, I’m not crazy. Just put it in. You’ll see 😉 )
⅛ tsp ground ginger (spice, not fresh)
½ cup buckwheat flour
½ cup brown rice flour
⅓ cup potato starch (tapioca or arrowroot starch would work too)
1 tsp guar gum (or xantham gum)
1 tsp GF baking powder
1 tsp baking soda
½ cup raisins
Glaze Ingredients:
1 small very ripe persimmon
3 tbsp maple syrup
3 tbsp coconut oil, liquified
1 tbsp non-dairy milk (optional; lightens the colour a bit)
1 tsp pure vanilla extract
Method
Preheat oven to 350F. Line a bread loaf pan with parchment paper and set aside.
Place roughly chopped persimmons (or puree if you already blended them down), olive oil, banana, maple syrup, vanilla, and spices into a blender and blend into a smooth and uniform mixture. Transfer into a large mixing bowl.
Add in all remaining bread ingredients, except raisins, and mix until everything is combined and uniform. Fold in the raisins.
Pour into your prepared bread loaf pan and bake for approximately 1 hour and 5 minutes (or until a skewer inserted down the centre comes out dry. Remove from oven and cool on a cooking rack.
In the meantime, prepare the glaze by blending all ingredients together in a blender. Once the loaf is cooled, transfer it onto your serving plate and drizzle with the glaze. Note: persimmon tends to gel up very easily once blended, so if you leave your blended glaze to sit in the blender for a bit and it gels up, simply re-blend for a few seconds and it’ll liquefy.
Happy Sunday beautiful cats! How are you? Earlier I went for a walk with a friend and her dog: it was so nice to chat with her while enjoying the relatively fresh air. I was feeling pretty negative about Christmas and I think that my parents, especially my mom, don’t feel that great either as it will be the first Christmas without Grandma: I know it will be a bit heavier and a lot sadder. At the same time, for one reason or another, this year has been a lot on a personal level and I am not sure how I am going to deal with visiting all the relatives. On the other side, I feel like I am being selfish and unreasonable: so many people would like to have a day with the whole family and they won’t be able to have it, while I have it and I struggle with it. I firmly believe that Christmas is overrated especially for those who are not religious: it has lost a lot of meaning, becoming a consumer holiday. I also realise that it is a great excuse for gathering all your relatives that you might not be able to see during the year, to meet in one place on one day. Which I understand well. My friend made me realise that it’s okay to not like the holiday and also the fact of seeing all the relatives together, but also I go for my parents, I am there for my parents. And to be honest, that’s the very minimum I can do. So, having said all this: I started off feeling negative about December and worrying about the upcoming days, when I should focus on appreciating all these other days, and when Christmas arrives, I should appreciate that day too and the people around me.
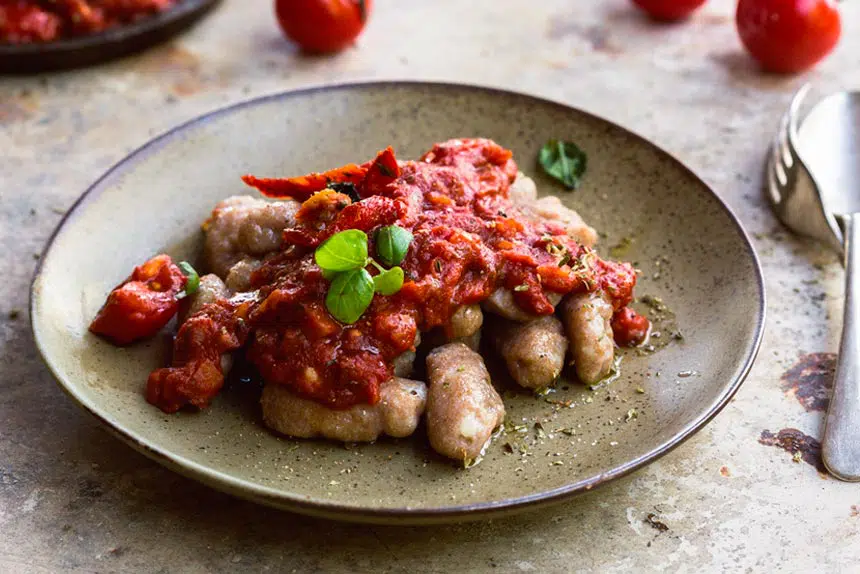
To being more serene! And on this note, few things make me happier that those delicious potato pillows also known as gnocchi. And since I had a lot of potatoes stored away, I had to make gnocchi. Didn’t have white flour so I followed this recipe for Whole Wheat Gnocchi by Nutriciously and it was delicious!
Place the washed whole potatoes into a pot, unpeeled. Cover them with water and bring to a boil, then reduce heat and let them simmer for around 30 minutes or until potatoes are cooked.
Once they have become soft, drain the potatoes and let them cool for a few minutes, then peel them.
Place the peeled, warm potatoes in a bowl and mash them until smooth. This works best with a masher or a fork. Don’t use a food processor or blender!
Add the whole wheat flour incrementally to the mashed potatoes and start kneading until you get a nice homogenous dough without overworking the potatoes. Don’t forget your pinch of salt!
You should end up with a soft, not too sticky dough and all of the flour should be absorbed by the potatoes. Depending on the potatoes you use and how well they were cooked and mashed, you may need a little bit more or less flour.
Cover the bowl with a towel and let the dough rest for about 10 minutes. Then, divide the gnocchi dough into 4 parts.
Thoroughly flour a clean workspace and your hands, then grab one of the changes and roll it into a long rope, about 1-inch in diameter. Repeat with the rest of the gnocchi dough.
Cut each rope into 1-inch long pieces to create your gnocchi pillows. You can cook them like that or use a fork to create the traditional ridges.
Meanwhile, bring water to a boil in a large pot. Add about half of the gnocchi and boil them for 2-3 minutes until they start floating to the top.
Remove the cooked gnocchi with a slotted spoon and put them into a bowl or on a plate. Add the rest of the uncooked gnocchi to your boiling water for 2-3 more minutes.
Once all of the whole wheat gnocchi are cooked, divide them into bowls and serve with your favorite sauce.
Hello cats! How are you today? Did you have a nice week? Yesterday, snowed! It lasted only a few hours, but it was beautiful! And I loved it as I was off and was taking it extra easy. It was also a busy week and didn’t really manage to make much foo, but I wanted to make something sweet and this recipe for Gluten Free Pumpkin Bread by EatWithClarity was exactly what I needed.
Hello beautiful cats! How are you? Here it’s finally starting to get colder and today was such a lovely day that I went for a walk with a friend: we went on an old path to an abandoned house and it was so peaceful although a bit eerie, too! Anyway, done my 10k steps for the day, had a lovely chai tea (just from a teabag, not the homemade one) and half a cinnamon bun (got it from a bakery that makes so many different vegan stuff and so it happens that their cinnamon buns and a bunch of other pastries are vegan – and they are massive!), so I am totally at peace with the world.
Yesterday, there was also a Christmas Market so I went to see what was there (had to go at lunchtime as I was working) and there was one fully vegan stall! Obviously, you should know that your girl here went a bit mad: got two different types of sausage rolls, one mac&cheese pie, one Moroccan pie, one mince pie and choc chip shortbread. Also they were selling some of the Honestly Tasty cheeses so I got myself a Shamembert as I never tried that! The thing is, these are going to be my lunch/dinner for the next couple of days, or can go in the freezer as they are freshly made. So I am going to have some tasty food to look forward to! However, usually, when on the last day of the working week (either Friday or Saturday) I usually have a bit of pasta for lunch – it’s basically my treat – and after seeing some videos of the Korean Vegan, I started making cheesy pasta with kimchi: never I thought in my life to combine these two things, and yet here we are, now it’s one of my favourite pasta dishes. So, here it is the delicious Kimchi Mac&Cheese by TheKoreanVegan! This is the more complete version, while if I am on my lunch break I would just make a cheesy sauce in the pot, add some kimchi and then the cooked pasta.
1 cup cashews (soaked in water for 4 hours to overnight)
3 tbsp nutritional yeast
1/2 cup almond milk
1 tsp pickled jalapeno juice
2 tsp kimchi juice
1 box brown rice pasta
1/2 cup bread crumbs
1/2 tbsp + 1 tbsp sesame oil
1/2 tsp agave
1/2 tbsp gochujang
1/2 cup kimchi (ripened)
1 tsp toasted sesame seeds
Method
In a small pot, melt vegetable shortening and add onions and garlic. Cook until softened. Then add potatoes, jalapeño, chipotle, gochujang and seasoning. Stir until potatoes start to soften and all vegetables are evenly coated.
Deglaze the bottom of the pot with water and bring to boil. Cook until potatoes are tender.
Empty contents of pot into high powered blender. Add remaining ingredients and blend on high for a few minutes, until creamy and smooth.
Cook pasta until al dente. Reserve ~1/4 cup of pasta water before draining. In the same pot that you cooked the pasta with, add pasta and cheese sauce, as well as a little pasta water in case sauce gets too dry. Scoop pasta into oven safe container (I used two cast iron pans).
For breadcrumb topping, mix breadcrumbs, salt, and 1/2 tbsp sesame oil until breadcrumbs are nicely coated. Sprinkle over the top of the pasta.
Place in 450° oven until breadcrumbs are golden brown (15-20 minutes).
In the meantime, heat up 1 tbsp of sesame oil in a small skillet. Add kimchi, gochujang, and agave and saute until kimchi is caramelized.
Add caramelized kimchi to baked pasta. Sprinkle with toasted sesame seeds.
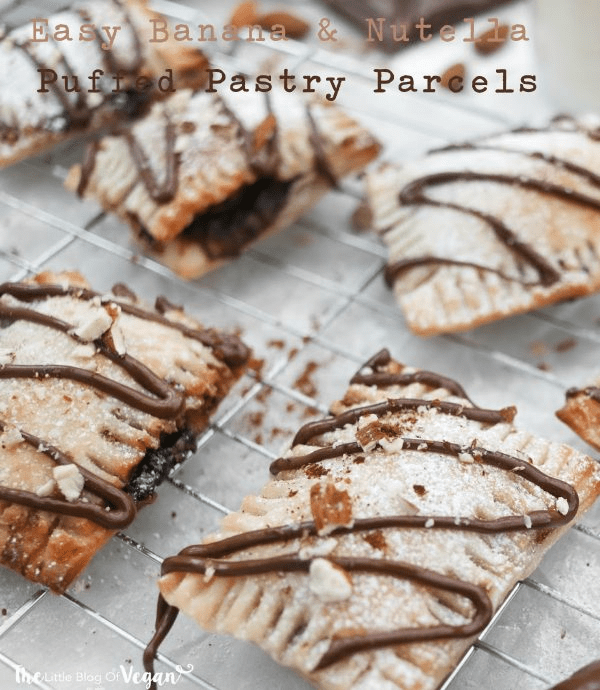
Happy Sunday, beautiful cats! Are you having a nice weekend? The past week has been another busy one: had to take my car to service, went to see another physiotherapist for my neck (I think it was a helpful session, although the pain never goes away 100% – my cervical spine is basically done, I have disc degeneration and basically discs in my cervical spine are compressing the nerves in that area and my upper back is always sore – I’ll try to share all the different treatments that I’ve done and hopefully it could help someone out there), then my taekwondo pre-grading (other two and I’ll be able to grade 1st Kup, red belt black tag!). And yesterday was so sunny that it was perfect for doing washings and put them out – and while I was there, I started doing some weeding. Also finished a book, ‘Paper Cup’ by Karen Campbell (funny and emotional, talking about homelessness in such a sweet way, without being sentimental. absolutely recommended!) and started ‘Queen Macbeth’ by Val McDermid (will let you know about this, but seems promising). And despite all this, I only slept 4 hours last night – quite unacceptable as I can usually sleep around 10-12 hours if I don’t have anything specific to do. So, I’m shattered. But you know me and you know that I love something sweet to eat – if this is also quick to make and has few ingredients, then we have a winner, which is what these Easy Banana & Hazelnut Chocolate Spread Puff Pastry Parcels by Holly Jade at A. Vogel are. Easy and delicious, you can also sub the hazelnut chocolate spread for peanut butter.
Hazelnut Chocolate spread (Added into a piping bag)
Crushed hazelnuts
Icing sugar
Cacao powder
Method
Preheat your oven to 210oC and line a baking tray with greaseproof paper.
Unroll your puff pastry sheet and cut into equal squares.
Place a teaspoon of hazelnut-chocolate spread and 4 slices of banana in the centre of each square, leaving around 1/4 inch to seal the edges with dairy-free milk, then top off with another pastry square. Only add mixture to half of the squares. Repeat for all of the parcels.
Press the edges firmly together with a fork. Make sure they are sealed or they will burst/leak when baking. Repeat for all of the parcels.
Pop the pastries into the oven and bake for around 10-15 minutes until fully baked.
Once puffed up and golden in colour, carefully remove the pastries from the oven and pop onto a cooling rack. To serve you can drizzle over some hazelnut-chocolate spread, a sprinkling of crushed hazelnuts and a dust of icing sugar & cacao powder. You can put 3 tablespoons of hazelnut-chocolate spread into a piping bag and drizzle some all over each pastry. Best served warm. Store in a sealed container and enjoy within a few days of making.
Happy Sunday, my cuties! How are you? I know I haven’t been blogging much, but there has been a lot going on in the past months and now too – the phrase “Why am I doing this?” came out often in the past few weeks, both at work and in my personal life. Doing this Master’s degree is taking much of my free time and at work I get involved in many events and various projects: and I know that in the end, it is all positive, gaining more experience in a sector that I love, creating a bigger network and consequently also increasing visibility of the library where I work, meaning that more people will know about it and use it – it’s all positive. But it takes a toll on me, on my energy levels, mentally and physically. And every year, I tell myself that I won’t be dragged in any extra project or event and just “do my job”, but I believe that inevitably, if you are interested in your job, if you are passionate about what you do (which makes it easier to get out of bed every day to spend 8 hours at work), inevitably you’ll end up being involved in things to try and make that place better. Or at least this is what I am telling myself! Anyway, all this to say that I am quite fatigued and tired, was working yesterday and on Wednesday (my day off) I was doing a lot of “life-admin” like renewing all the various contracts, making an appointment with the dentist, going to see my osteopath, etc. However, you know how you get YouTube notifications for the channels you follow? I got the notification for this video by Merle O’Neill (if you don’t follow her, what are you even doing?! Joking, but really she’s lovely and so creative!) where she tests Viral High-Protein Vegan Meals from other food creators, and I tried two of them that are just amazing and helped me going through the week! Will definitely make more in the next few days 🙂
1½ cups chickpeas, approximately 1 can, drained and rinsed
1 tbsp extra virgin olive oil
2 tsp paprika
1 tsp cumin
½ tsp garlic powder
1½ tsp salt
1 cup quinoa, cooked
3 cups spinach
1 avocado, peeled, pitted and chopped
1 cup cucumber, sliced
½ cup pickled red onions, optional
3 tbsp fresh dill, optional
Tofu and Herb Dressing
1 cup extra firm tofu
1 handful parsley
1 handful fresh dill
1 tbsp nutritional yeast
1 tsp salt
1 lemon, juiced
1 clove garlic
¼ cup water, or more as needed
Method
Preheat the oven to 400F and line a baking sheet with parchment. If you don’t already have quinoa prepared, cook it according to package directions at this time. 1/3 a cup of dry quinoa will typically lend 1 cup cooked.
Place the chickpeas, onion, cauliflower and sweet potato on the sheet pan, and drizzle with oil, and then the spices. You can do this in a bowl for easier preparation, if desired. Roast for 35 minutes, until the sweet potato and cauliflower are slightly soft.
While the vegetables roast, prepare your high protein dressing. In a blender, combine the tofu, parsley, dill, nutritional yeast, salt, lemon, garlic and water. Combine until smooth, adding more water as needed to reach a desired consistency.
When the vegetables are roasted, place a bed of spinach in a bowl, and disperse the toppings as desired, with fresh avocado and cucumber on top. If desired, add pickled onions and dill. Drizzle on the high protein dressing and enjoy
1/2 a butternut squash, seeds removed and cross scored
Olive oil and salt on all of the roasted veg
For the creamy sauce:
The roasted butternut squash flesh
30g soaked cashews
280g silken tofu
1/3 cup nooch
Juice of one lemon
1/4 tsp salt
Black pepper
Splash of water for blending
For the main body
2 tbsp olive oil
1 tsp cumin seeds, toasted and ground
1 tsp coriander seeds, toasted and ground
1 red onion, finely diced
Pinch salt
4cm piece of ginger, grated
3 garlic cloves, grated
1/2 a red chilli, deseeded and finely chopped (omit if you like less spice)
1/2 tbsp Garam masala
1.5 tsp coriander, 1.5 tsp cumin
1/2 tbsp curry powder
1/2 tsp turmeric
2 tsp smoked paprika
1/2 tsp cinnamon,
Salt, black pepper and olive oil
120g grated fresh tomatoes or canned chopped tomatoes (about half a tin)
240g cooked chickpeas
1/2 a litre of veg stock
To serve: coriander, nigella seeds, yoghurt
Method
Pre heat oven to 200c
Break the cauli into florets, chop the sweet potato into medium chunks. Transfer to a baking tray, cover in oil, spices and salt. Score and oil the squash, then place cut side down on another tray. Oil the other side. Roast everything for 30-35 mins until taking on a nice golden colour.
Soak the nuts in boiling water and set aside. Tear the tofu into irregular chunks. Add all the tofu marinade ingredients to the tofu and combine. Set aside in the fridge.
Chop all your aromatics, grate your fresh tomatoes and measure out spices. Toast the whole spices in a dry frying pan, then bash in a pestle and mortar.
Fry the whole bashed spices in olive oil for 1 min, then add the onion and a pinch of salt. Fry on a medium heat for 8-10 mins. Add the ginger, garlic and chilli, fry 3 mins more or until the raw aroma of garlic and ginger has subsided. Add the dry spices and some more olive oil, fry for 1/2 mins more, add the grated tomatoes and another pinch of salt. Fry until they turn a dark shade of red, about 5 mins. Add the chickpeas and stock, bring the heat up then reduce and simmer for 10 mins.
Take the sweet potato and cauli out the oven when finished roasting. Transfer to a bowl. Take the tofu out the fridge and transfer to the same baking tray. Bake for 10-15 mins, until the tofu is taking on a little char.
Take the squash out, allow to cool. Scoop out the flesh and add it to a blender with the other creamy sauce ingredients. Blend until smooth, then add to the spicy chickpea mixture, reserving a little for garnish. Stir through most of the roasted veg, saving some for decoration.
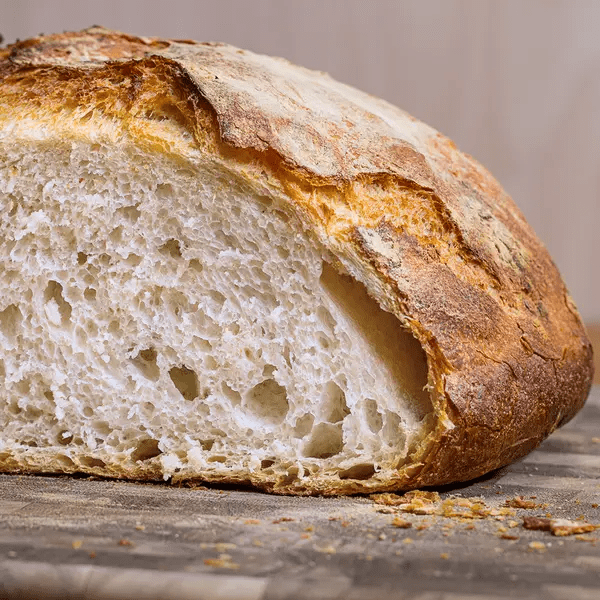
Hello cuties! I hope you are well and having a good weekend! This week went by very quickly, but it was also full of events: while on annual leave, I met with a friend and went to the sea, saw my osteopath for my neck and shoulders pain, attended the last virtual session of the academic year for my Masters course and then back to work. On my last day off, I went to the shop for some veggies and was tempted to get some bread, but then decided to make it myself so I made this Dutch Oven Bread by Tasty.co and it really didn’t disappoint: if you want homemade bread, but are put off from all the kneading, then this is the recipe for you because there is very minimal kneading involved and you get a great result!
2 cups lukewarm water (480 mL), between 90˚-110˚F (30˚-40˚C)
1 envelope active dry yeast
4 cups all-purpose flour (500 g), lightly packed and levelled off, plus more for dusting
1 ½ teaspoons kosher salt
1 teaspoon olive oil
Method
Stir the yeast into the water and allow the yeast to bloom until foamy.
In a large bowl, mix together the flour and salt by hand. Once incorporated, create a small well in the middle and pour in the water and yeast mixture.
Mix by hand, wetting your working hand before mixing so the dough doesn’t stick to your fingers. The water and flour should come together and a form rough dough that pulls away from the sides of the bowl. If the dough is too sticky, add more flour in small increments, about 1 tablespoon at a time. If the dough is too dry, add more water, 1 tablespoon at a time.
Once the dough comes together, cover and let rise for 1 ½-2 hours, until doubled in size.
Uncover the dough and give it a few pokes with your finger. If the dough has risen properly, it should indent under the pressure of your finger and slowly deflate.
Using your hand or a rubber spatula, start from the rim of the bowl to work the dough loose from the sides and fold it up and towards the center of the bowl. Turn the bowl 90 degrees, and repeat until all the dough has been pulled from the sides and folded towards the center.
Once finished, cover and let the dough rise again for another 1 ½-2 hours.
Once the dough has doubled in size again, gently transfer it from the bowl to a lightly floured surface.
Sprinkle a bit of flour on top of the dough. Using your hands, begin to shape it into a loaf. Fold the dough under itself several times to form a ball, then pinch together the seams of dough underneath.
Place the dough seam-side down in a clean bowl that has been lightly coated with olive oil and dusted with flour.
Cover and let rise for 1 hour.
Meanwhile, place a 6-quart Dutch oven (or heavy cooking pot with oven-safe lid) inside the oven. Preheat the oven to 450˚F (230˚C) with the pot inside for 45-60 minutes.
Carefully remove the pot from the oven and place it on a trivet or heat-safe surface. (Be careful! It’ll be VERY HOT.)
Turn the proofed dough over onto a lightly floured surface and carefully place it inside the pot.
Cover with the lid and return the pot to the oven.
Bake for 45 minutes, removing the lid for the last 15 minutes.
Remove the bread from the pot and let cool for 10 minutes before slicing.
I put almost half of the slices in the freezer so that I have nicely homemade bread whenever I want it.
Happy Sunday, beautiful cats! How was your week? I’m honestly looking forward to a few days off that I’ll take at the start of August. While in the past days I haven’t been as shattered as I was in June, I feel that I need a break – just a couple of days off – and I am thinking of going somewhere for two days, but I still haven’t decided. We’ll see! In the meantime, I wanted to share this recipe for a Spinach and Chickpea Curry by VeganOnBoard that was delicious and perfect for a weekday night!
1 can chickpeas rinsed and drained, or 240 g (8.5 oz) cooked chickpeas
1 teaspoon salt
4 cloves garlic minced
1 inch piece ginger grated
2 teaspoons ground cumin
2 teaspoons ground coriander
1 teaspoon paprika
½ teaspoon ground turmeric
¼ teaspoon cardamon
¼ teaspoon cayenne pepper
1 can chopped tomatoes 400g / 14 oz
1 teaspoon garam masala
10 cups (300 g / 10 oz) spinach washed and chopped
1 teaspoon lemon juice
Instructions
In a large, deep frying pan, heat up vegetable oil on medium heat and fry the cumin seeds for 30 seconds.
Add the sliced onions and brown sugar. Saute for 5 minutes, stirring occasionally.
Add rinsed and drained chickpeas (cooked or canned) and salt. Turn up the heat to medium-high and saute for 5 more minutes while stirring more regularly, until onions are translucent and starting to brown.
Turn heat back to medium and add garlic, ginger, and the ground spices – cumin, coriander, paprika, turmeric, cardamon, and cayenne, and fry for 2 minutes.r
Add the chopped tomatoes and cook on medium heat for 10 minutes. Stir occasionally.
Turn the heat back to medium. Stir in the garam masala, then add the spinach and lemon juice. Cook for 2 – 4 minutes to let the spinach wilt down. Serve with rice, vegan naan, chapati or bulgur wheat and your favourite chutney.
Hello cuties! How are you? The past week has been quite intense: from the library being short-staffed, to attending a meeting on the future of public libraries and then taking my cat to the vet for a dental operation, I was glad to get to Friday night for a quiet weekend recharging from all this! Being short-staffed means that I have to cover the main desk, which translates in me doing a double job of my research and serving at the desk. The event was organised by our professional body and was more of a brainstorming session on how to be prepared in future adversities for the public library service – interesting, but also frustrating as I believe all those working in this sector have seen having its budget reduced year after year, so it’s not like we are detached by the events. At her yearly vaccination, my cat was found to have a lot of tartar on her teeth. They can only clean cats’ teeth by having them anesthetised – I had to leave her for a whole day at the vets. It was the first time we were separated that way and while I am painfully aware that there are other and more difficult situations in the world, it was horrible having to leave her by herself. She was totally fine when I took her back, and she slept a bit in my bed that night and the following one.
¾ cup creamy peanut butter (low sodium if preferred)
¼ cup cocoa powder
2 teaspoons pure vanilla extract
Top Layer
¾ cup mini chocolate chips + more for optional topping
½ cup creamy peanut butter (low sodium if preferred)
Chopped Peanuts (optional)
Instructions
Line an 8 x 8-inch baking dish with parchment paper. Set aside.
Pour rice cereal into a large bowl and set aside.
Combine the brown rice syrup and brown sugar in a saucepan over medium heat, stirring well. It will be thick like paste, but turns to liquid as it warms. Cook until bubbly, about 2-3 minutes, stirring often with a spatula, then remove from heat. Immediately add ¾ cup peanut butter, cocoa powder, and vanilla extract. Stir until well combined.
Pour the mixture over the rice cereal and gently fold together using a spatula until it’s well-coated. The mixture will be thick and may seem like it won’t cover the cereal, but keep stirring, it will be enough.
Transfer the cereal mixture to your prepared pan. Press it down firmly into an even layer using a spatula.
Add the chocolate chips and ½ cup of peanut butter to a microwave-safe bowl. Microwave on 50% power in 30-second increments until melted and smooth. Stir each time.
Pour it over the cereal mixture and spread it into an even layer. Tap the pan a few times to even out the chocolate coating. Sprinkle with peanuts and chocolate chips to decorate if preferred. Place the pan in the refrigerator to cool for 30-60 minutes until the chocolate is set.
To cut, pull up each side of the parchment paper and place on a cutting board. Cut into squares. Store in an airtight container at room temp for 5-7 days. You can also freeze them for 2-3 months.
Happy Sunday, cats! How are? Enjoying your weekend? I wasn’t working yesterday so I am taking these two days to just relax after working at the main desk for a good part of the week to cover some shifts as we are so short staffed, meaning that I had to do my usual job while also issuing/returning books and helping people with IT. No wonder I feel exhausted! And it will be like this the whole month. Oh well. As I say, the two main pleasures in life that you can do just by yourself, are eating and sleeping so this is how I have been coping with everything in the past few months. It was quite a while since I wanted to make this Mung Bean “Egg” Recipe by TheEdgyVeg and I finally managed to make it last week, and not for lack of trying: the first time, I made it with yellow peas and it wasn’t great; finding the yellow mung beans wasn’t easy but then I bumped into the yellow split lentils and I know they are not the same, but even with these the recipe came put great! As Candice says, you can use this recipe as an egg substitute like you would do with Just Egg: I’ve used it for a Potato and Onion Omelette and then for a Spring Onion and Carrot Tops Quiche. Absolutely delicious!
1 cup split yellow mung beans/moong dal/yellow lentils, soaked overnight
1 cup unsweetened soy milk
1 tsp black salt or Kala Namak
½ tsp salt
2 tbsp olive oil or deodorised coconut oil + extra for cooking
½ tsp turmeric
½ tsp garlic powder
½ tsp onion powder
1 ¼ tsp baking powder
3 tbsp nutritional yeast
1 tsp tapioca starch, optional
pepper to taste
paprika, to serve
Instructions
Drain your soaked mung beans, and rinse them. Then, to the blender, add soy milk, black salt, regular salt, olive oil (or coconut oil), turmeric, garlic powder, onion powder, nutritional yeast, baking powder (and tapioca starch if you have it). Blend on high until smooth, thin and pourable.
Heat a non-stick pan over medium-high heat and heat up with oil (i use about 1 tbsp).
Pour in the bean mixture, use a rubber spatula to stir and move the mixture around. Cover for 1-2 minutes.
When parts of the mixture start to look like they’re “drying”, use a spatula to stir and move the mixture around to create a scrambled texture. Cover and cook for another 2 minutes.