Hey, cats! How are you these days? Here it’s been a good week – I was working yesterday but I went to deliver a course in one of the nearby libraries and it’s always a pleasure going there, the drive there is very scenic and yesterday could have not been a better day to go as it was a cold, clear-skyed day, with all the autumnal colours around! Really a beautiful view that made my day, one of those views that recharge the spirit. When I came back I felt energised and managed to do quite a lot of things – feeling very positive. And these Almond Flour Cookies by ElaVegan were just what I needed for this lovely day!
First, preheat the oven to 350°F (175°C) and line a cookie sheet with parchment paper.
Then, mix the almond flour, baking powder, and sugar in a medium bowl (or a food processor) until there are no lumps.
Add the almond butter (or nut/seed butter of your choice) and mix well. If the dough is dry, which it likely will be, add a tablespoon of water and mix again.If it’s still too dry, add more water, a teaspoon at a time, mixing thoroughly in between.
Fold in the chocolate chips, reserving a few for the top, then use a small ice cream or cookie scoop or tablespoon to divide the dough into 6 cookies.
Spread the cookies across the prepared baking sheet with space in between, using your fingers to flatten them gently, and press the reserved chocolate chips into the top.
Bake the cookies for 11-12 minutes until they’re lightly browning on the edges. They will be soft right out of the oven, but firm up as they cool. Leave them to cool on a wire rack. Enjoy!
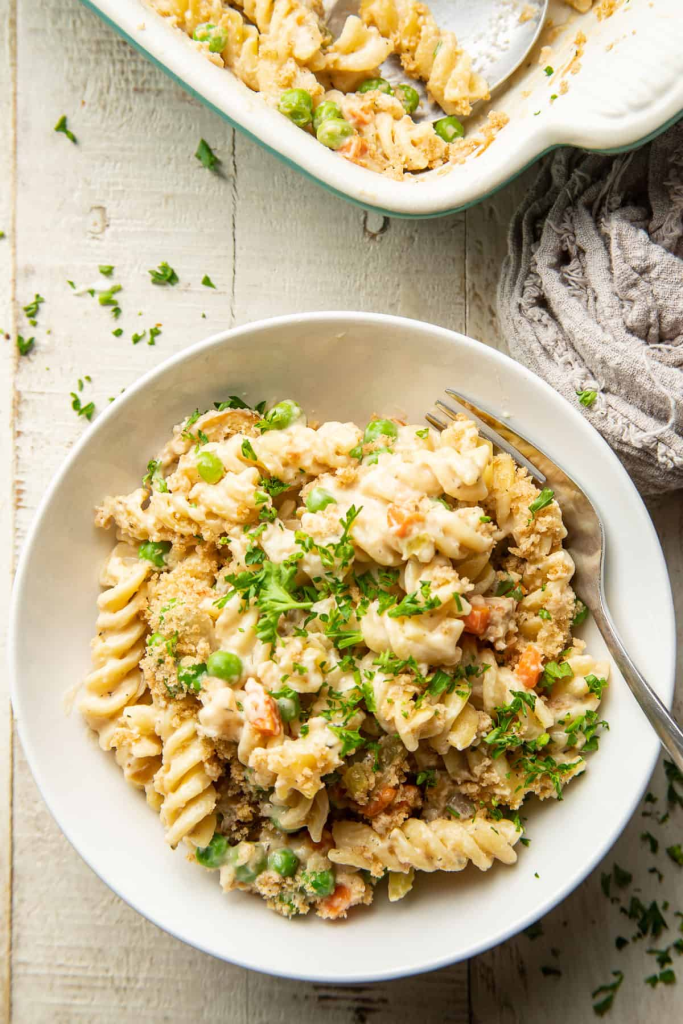
Hi beautiful cats! How are you? Are you enjoying your weekend? Last week, I finished the macrobiotic detox, but I keep making miso soup and drinking kukicha tea just to keep me right. However, I am also reintroducing the food that I couldn’t eat during the detox, i.e. pasta. And this Creamy Vegan Noodle Casserole by ConnoiserusVeg is exactly what I needed! Easy and delicious with minimum effort – perfect for a weekday lunch.
10 ounces dried rotini pasta (about 3 ½ cups of pasta)
½ cup raw cashews, soaked in water 4 to 8 hours, drained and rinsed
1 cup water
3 tablespoons vegan butter, divided
8 ounces button mushrooms, cleaned and sliced
1 medium onion, diced
2 medium celery stalks, diced
2 medium carrots, diced
2 garlic cloves, minced
3 tablespoons all-purpose flour
2 cups unflavored and unsweetened non-dairy milk
3 vegetable bouillon cubes, crushed
1 teaspoon dried thyme
1 tablespoon lemon juice
½ cup frozen peas, thawed
Salt and pepper, to taste
½ cup panko breadcrumbs
Method
Bring a large pot of salted water to a boil. Add the pasta and cook it according to the package directions. Drain the pasta into a colander when done.
Place the cashews and water into a blender and blend until smooth. Set aside.
Coat the bottom of a large skillet with two tablespoons of the vegan butter and place it over medium heat.
When the butter has melted, add the mushroom slices in a relatively even layer.
Cook the mushrooms for about 5 minutes on each side, until golden brown. Remove them from the skillet and transfer them to a plate when done.
Add the remaining tablespoon of butter to the skillet. Once the butter melts, add the onion, celery, and carrots.
Cook the veggies for about 5 minutes, stirring frequently, until they begin to soften.
Add the garlic and flour. Stir the mixture well to coat the vegetables with flour and continue cooking the mixture for about 1 minute.
Slowly begin adding the non-dairy milk, stirring in just a bit at a time to prevent the flour from clumping. Once all of the milk has been added, stir in the cashew mixture, bouillon, thyme, and cooked mushrooms.
Raise the heat and bring the mixture to a low boil. Lower the heat and let it simmer for about 10 minutes, stirring frequently, until thickened slightly. Preheat the oven to 350°F while the sauce simmers.
Remove the skillet from heat and stir in the lemon juice.
Combine the cooked pasta, sauce mixture and peas in a 2-quart casserole dish.
Season the mixture with salt and pepper to taste.
Cover the casserole dish and place it into the oven. Bake the casserole for about 20 minutes, until heated throughout.
Remove the foil from the dish and sprinkle the casserole with panko breadcrumbs. Bake 5 minutes more.
Let the casserole sit out for 5 minutes before serving.
Happy Sunday beauties! How are you enjoying the autumn weather? Last night we changed the clock and I had just a long lie in this morning, I felt very rested and managed to do so many things! Also, I am coming to the end on my “Macrobiotic Detox” that I felt I could celebrate with a nice dessert which is still mostly Macrobiotic. In case you are interested, I am preparing a post explaining a bit the macrobiotic diet. In the meantime, I leave you today’s recipe: Chickpea Blondies by Rainbow Nourishments.
~1 ½ cups (250g) chickpeas, canned or fresh and drained well (I got this amount from one 15oz or 440g can)
½ cup (125g) cashew butter, or nut/seed butter of choice
½ cup (45g) oat flour,
½ cup (170g) maple syrup
2 teaspoons vanilla extract
1 teaspoon baking soda
⅛ teaspoon salt, or to taste
½ cup (85g) mini dairy-free chocolate chips plus extra to decorate
Method
Line an 8-inch square baking pan with parchment paper. Preheat your oven to 180°C (350°F).
Add all the ingredients except the chocolate chips to a food processor or blender Blend until the mixture is as smooth as possible. It should be slightly runny.
Remove the blade of your food processor. Add the chocolate chips and mix with a spoon or spatula. Make sure your blondie batter isn’t warm when you add the chocolate otherwise the chocolate will melt.
Pour the batter into your prepared baking pan. Smooth the surface with a spoon or spatula. If desired, sprinkle additional chocolate chips on top of the batter and press them in.
Bake the chickpea blondies for 23-28 minutes. The blondies are ready when they have puffed up and the surface is golden brown. If you insert a toothpick in the middle, it should come out clean (a few moist crumbs are fine but there shouldn’t be any wet batter).
Place the square baking pan on a wire rack. Allow the blondies to cool completely in the baking pan for at least 1 hour. The blondies are very soft when they’re warm.
When the blondies have completely cooled, remove them from the baking pan and cut them with a sharp knife. The blondies are very fudgy so it may help to run your knife under hot water before cutting them. If desired, sprinkle the blondies with flaky sea salt or enjoy with vegan ice cream.
Happy Sunday everybody! How are you? The past two weeks have been really busy: 3 events in 3 weeks and I’ve been needing a bit of time to recover. I didn’t want to risk burnout and feeling overwhelmed like it happened last year, so I took some much-needed rest this time. Also, this month started with a “Macrobiotic Detox” – it was supposed to be only a week, but decided to extend it to a month. I am preparing a post to explain what can be eaten when following a vegan and macrobiotic diet. In a way, it has some similarities with the Spring detox that I’ve been doing for the past 2 years (“Limpia”), but the main difference is that the Macro lifestyle has a very interesting principle of balance between Yin and Yang. Anyhow – will explain all this in my next post, so stay tuned! As we are definitely into Autumn, pumpkins are everywhere and they are also a beloved ingredient in the Macro diet. So here is a recipe that I have been enjoying without getting bored – Happy Holiday Salad by The Macrobiotic Association.
Heat the oven to 375 degrees. Put the squash in a roasting tin with 1-2 tablespoons of oil, and season well. Roast for about 40 minutes, stirring once, until the squash is soft and colored round the edges.
Add the umeboshi vinegar to the crumbled tofu and mix well.
Place a tablespoon of oil into a skillet over a medium heat. Add the mushrooms and a little salt and pepper, and sauté for a few minutes, until any liquid they release has evaporated, and set aside.
In a bowl, combine the squash and the just-warm mushrooms with the arugula and tofu. Add the basil and a generous dash of balsamic vinegar.
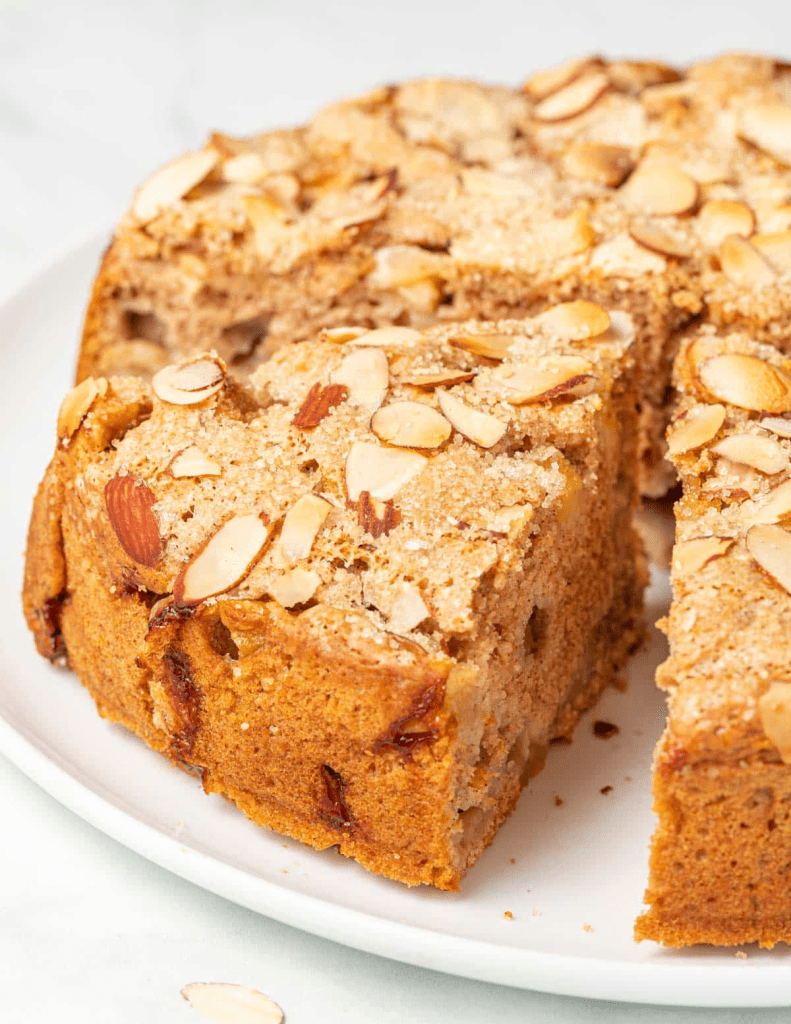
Happy Sunday, beautiful kittens! How are you? Autumn is definitely here and it couldn’t be sweeter! Again another super busy week as we’re getting the last things ready for a big event next Saturday at the library. But I wanted a homemade, sweet something that I could eat for breakfast or as an after-dinner treat. Since I’ve been so lucky as to be gifted literally bags full of organic apples from a customer of my partner, and the weather has really been so autumn-y, I couldn’t resist to the temptation of an apple cake. This is the go-to cake for my mom, everybody loves the apple cake that she makes almost every Sunday, but I’ve never been too much of a fan even before going vegan (after that, I couldn’t have it because she uses eggs). And now, I had this craving, for a comforting homemade apple cake: maybe I am turning into my mom or maybe it’s the Autumn – who knows. What I do know, is that I am here to share the recipe that I followed (not all of it, I didn’t have the yogurt, but it came out just lovely) to make a very easy yet delicious Vegan Apple Cake by AVirtualVegan.
3 cups (375 grams) all-purpose flour, (plain flour in the UK)
2½ teaspoons baking powder
½ teaspoon baking soda, (bicarbonate of soda in the UK)
2 teaspoons ground cinnamon
¼ teaspoon ground nutmeg
½ teaspoon fine sea salt, not table salt
½ cup + 2 tablespoons (144 grams or 150 mls) vegan yogurt, vanilla or plain, preferably unsweetened
¾ cup + 2 tablespoons (180 grams)sugar, cane, white granulated or light brown
1 cup (240 ml) unsweetened plant milk
5 tablespoons (75 ml) liquid oil , any neutral tasting oil like sunflower, vegetable, canola or melted refined coconut oil. For oil-free see the recipe notes.
1 teaspoon (5 ml) apple cider vinegar, or lemon juice
1 tablespoon (15 ml) vanilla extract
5 medium apples, about 700g (1.5 lb) of apples weighed before peeling/coring
For the topping
¼ cup (50 grams) coarse sugar, like turbinado or demerara
¼ cup (25 grams) flaked almonds, OPTIONAL (omit for nut-free)
Method
Preheat oven to 360 °F (182 °C) and make sure you have a shelf placed in the middle of the oven.
Grease a 9-inch springform cake pan that’s at least 3 inches deep or a 9 x 13 dish/pan. If using a cake pan cut a circle of parchment paper and put it in the bottom.
To a large bowl add the flour, baking powder, baking soda, cinnamon, nutmeg and salt. Whisk them up to combine.
In another bowl, add the yogurt, sugar, milk, oil, vinegar and vanilla. Whisk them all up until well combined.
Peel, core and chop the apples into chunks of about ¼ inch.
Pour the wet ingredients into the dry ingredients and stir them together. Don’t over mix or beat it vigorously. Just stir gently until you can no longer see any dry flour.
Pour in the apple chunks and fold them gently and evenly through. Again don’t over mix.
Spoon into the prepared pan and level the top with a spatula. Sprinkle over the flaked almonds and the coarse sugar and place immediately in the oven on the middle shelf.
If in a cake pan bake for around 1 hour and 15 minutes. It might need up to 1 hour 20 minutes. Insert a toothpick or skewer into the centre of the cake. If it comes out clean then the cake is ready. If you see any signs of wet batter return to the oven for another five minutes. If baked in a 9 x 13 pan/dish check it at about 55 to 60 minutes. It might take a little longer though. The time will vary depending on whether you’ve used a metal pan or ceramic. Insert a toothpick or skewer into the centre of the cake. If it comes out clean then the cake is ready. If you see any signs of wet batter return to the oven for another five minutes.
Once cooked, remove from the oven and leave for at least 15 to 20 minutes in the pan to settle. Before attempting to remove from the pan carefully run a knife or long spatula around the edges to free up any sugar or caramelized apple pieces that might have stuck to the side. Leave the cake to cool on a wire rack. If you baked it in a 9 x 13 pan/dish, allow it to cool in the pan/dish and serve straight from the pan/dish.
I hope you’ll enjoy this for your breakfast, snack, after-dinner treat or any way you want!
Hello my beauties! How are you? Another week has gone by and to be honest, apart from work I haven’t been able to do much. Yesterday I had my Taek Won Do grading – it was a fairly big one as I went for the blue belt so it’s a bit of an achievement. But I wasn’t feeling it, I wasn’t feeling the same as I used to when I was doing Kung Fu and I’ve been feeling this for a while. But it’s the only martial art available in the rural area where I live, that could be sustainable and I am able to do it in winter too – so I do it. But yesterday I wasn’t feeling it. Oh well, it is what it is, right? I’m not saying anything against TWD, every martial art is different – yes, there are similarities among most of them, but they have different applications and especially different theories, so sometimes it might be more difficult to get into that TWD mindset after 7 years of Kung Fu. So, not complaining, just some reflexions. Anyway, the main thing here today is food! Lovely, delicious, easy-to-make food that satisfies your senses! And I’m presenting you the easiest yet most delicious broccoli soup – this is my go-to soup (almost at the same level as the Potato and Leek one!) and I’ve learned how to make it by PlantBasedFolk. Without further ado, the Easy Vegan Broccoli Soup by PlantBasedFolk.
Hiya my cats! And Happy Sunday! Last week was mental and I had an extremely busy weekend doing some more cleaning and tidying up, meaning that I wasn’t really able to sit down at my laptop for long. And while I had this week off, it was my birthday and my parents came to visit so I have been focused on spending time with them. Because between me being vegan and my mom being allergic to many various ingredients, I decided that I would make the birthday cake, or to be fair, cakes: I made a variation of the Pear Galette with Rooibos Glaze and also a Victoria Sponge by LazyCatKitchen. They both were a success with my parents! To make it more special, I used a homemade strawberry jam that a colleague made for my partner and me – delicious! So here is the recipe for this cake.
150 g / ¾ cup softened coconut oil or vegan butter block
300 g / 1½ cups sugar (coconut sugar for GF version)
2 tsp vanilla extract
1 tsp lemon extract (optional)
430 g / 3½ cups AP flour or GF flour mix
30 g / ¼ cup cornstarch/cornflour
½ tsp xanthan gum (only if using GF flour)
2½ tsp baking powder
¾ tsp baking soda
½ tsp salt
FILLING / TOPPING
250 ml / 1 cup vegan whipped cream (like Oatly)
2 tsp vanilla extract or paste
2 tbsp icing sugar, to taste
160 g / ½ cup quality strawberry jam
500 g / 1 lb fresh strawberries
METHOD
Heat up the oven to 180° C / 355° F (without the fan function) and grease and line two 20 cm / 8″ round cake tins.
Combine soy milk and lemon juice in a small pot and warm up until just barely lukewarm. It will curdle – that’s what it is meant to do.
Beat softened coconut oil (or vegan butter) and sugar with an electric mixer until nice and fluffy.
Once whipped, fold in about a third of the lemon soy milk mixture and both extracts.
Place a sieve over the bowl and sift in approximately a third of flour and all of the cornflour. Gently fold dry ingredients into the wet ingredients by making small circles in the middle of the bowl with your spoon to minimise lumps. It will take a while to incorporate well, don’t rush this step. Alternating dry and wet ingredients like this prevents the batter from being too runny to begin with and therefore lumps from forming.
Next, fold in another third of soy milk, followed by another portion of sifted flour.
Finally, add the last of the soy milk followed by both raising agents, salt and xanthan gum (for GF version) with your third batch of flour. Fold really gently so that you don’t knock too much air out of the batter.
Divide the mixture between two tins and bake until a toothpick comes out clean of cake crumbs, about 30-32 minutes.
Allow the cakes to cool down completely before removing from the tins and icing.
FILLING / TOPPING
Whip chilled vegan whipping cream in a clean bowl according to the instructions on the packet. Add vanilla and a bit of sugar to taste.
ASSEMBLY
Spread jam and cream on top of the first sponge cake, decorate with a few fresh strawberry halves.
Top with the second sponge cake, decorate the top with more cream and strawberries or if you are after a more traditional look, simply sprinkle the top with some icing sugar.
I hope you’ll enjoy this cake, whether for your birthday or for another Sunday 🙂
Happy Sunday, beauties! The past week has been so busy, managed to see a dear friend and the weather was so lovely we went for a walk and then for a delicious lunch at the local vegan cafe. But I’ve also felt overwhelmed at work as I had 2 meetings and a training day where I had to deliver a short presentation: at the time I felt like I maybe put too much stuff on my plate, but then I look at my colleague, she’s always meeting existing or potential partners, always organising events, delivering talks etc. and she seems so serene and calm. And I thought that I should try to be more relaxed with my work-life: I do my job and at the latest meeting with my manager he clearly said that I do even more than what my work entails. So, why am I taking things so personally? Like, I am way too involved with my work stuff. Yesterday was my Saturday on, and I wasn’t feeling well, almost the beginning of a cold – then all these thoughts came into my mind and I stopped, paused while I was creating the graphics for an event, and I started breathing in and out, mindfully. I spent 5 minutes, just trying to clear my head. Then I came back home for lunch and since it was sunny, I spent the break in the garden, doing nothing, just enjoying that time. Before going back to work, I made myself a lemon and ginger tea with a splash of apple cider vinegar to sip while I was finishing work. After work, I had a quick 20 minutes nap and decided to not do anything but rest. Made a quick dinner and had some green tea, then went to sleep. I kid you not, this morning I woke up quite rested but mostly no signs of a cold! I know, I probably am not telling you anything new, but maybe you forgot to “take it easy” and be more compassionate to yourself so this is just a reminder – you are doing great, you are doing your best, and even if your best is just getting out of bed, this is enough! You don’t have to prove anything to anyone.
That’s way too much chit-chat! So I leave you with a simple but nutritious recipe for those days where you can’t be bothered to cook but still want something tasty: Sheet Pan Tofu with Spring Vegetables by FromMyBowl.
Ingredients
For the Lemon Garlic Tofu:
14-16 ounces extra firm tofu pressed
2 tablespoons olive oil
2 tablespoons lemon juice
1/2 teaspoon garlic powder
1/2 teaspoon black pepper
1/2 teaspoon salt
For the Vegetables:
1 1/2 tablespoons olive oil
1 teaspoon Dijon mustard
1/2 teaspoon garlic powder
Black pepper to taste
1/2 teaspoon salt
1 bunch asparagus ends trimmed and cut into 2” pieces
8.5 ounces canned artichoke hearts drained, rinsed, and cut in half
4 ounces radishes ends trimmed and cut in half
2 tablespoons chopped fresh dill
Lemon Pepper Orzo or cooked rice for serving (optional)
Method
Preheat the oven to 415F. Set a large baking sheet aside and line with a silicone baking mat if it is not nonstick.
Cut the tofu into small triangles and place in the bottom of a small container. Add the olive oil, lemon juice, garlic powder, black pepper, and salt to a small jar and shake until emulsified. Pour the marinade over the tofu and gently toss the container until the tofu is coated. Let marinate for 15 minutes, or overnight in the refrigerator for a stronger flavor.
Transfer the tofu to a large baking sheet, leaving about 2” between each piece. (Note: discard the extra marinade behind or save it for drizzling on the tofu just before serving, if desired). Bake in the top rack of the oven for 20 minutes.
In a medium bowl whisk the oil, mustard, garlic powder, pepper, and salt together. Add the asparagus, artichoke hearts, and radishes and mix well. Set aside.
Take the tofu out of the oven, flip it, and scoot it all over to one third of the baking sheet. Transfer the vegetables to the baking sheet and spread them across the remaining two thirds. Return to the top rack of the oven and bake for an additional 15 to 20 minutes.
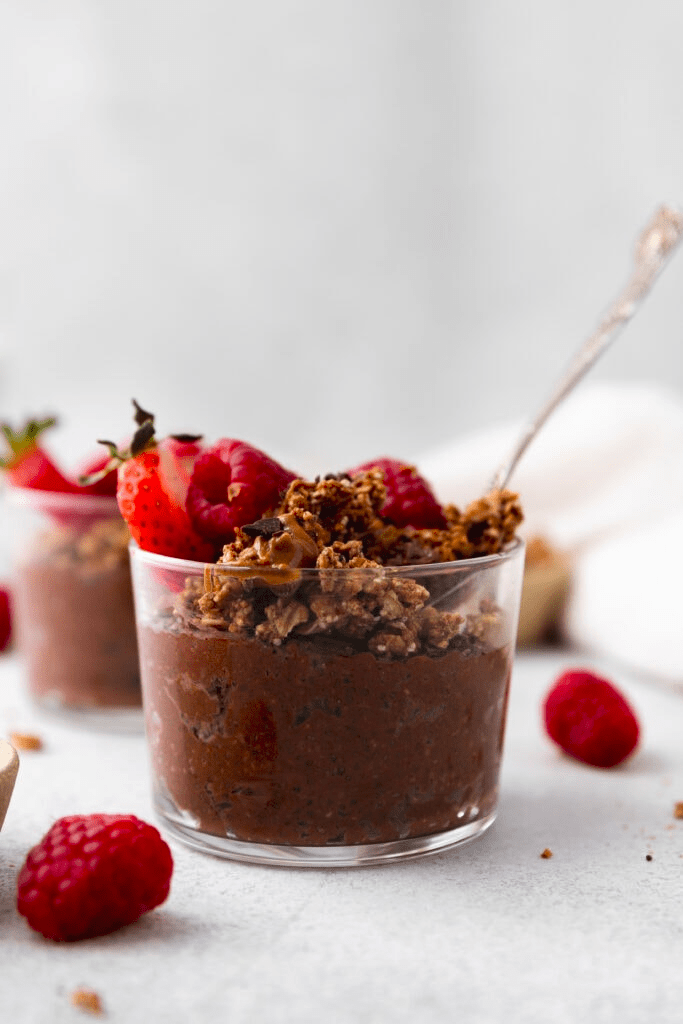
Happy Sunday, beautiful kittens! How are you? Are you enjoying your weekend? In some places of the UK, this is a holiday weekend, but alas, that’s not where I work so this is a normal weekend for me. Oh well, doesn’t really matter because I managed to have a lovely day yesterday with my partner (went to an artisan/farmers market in town and the vegan and cruelty-free products were almost everywhere!), then to the vegan cafe for a light lunch, a nice walk, made dinner and chilled watching The Last of Us (yes, we’re quite behind schedule in watching this series compared to the rest of the world). Today was another relaxing day, although I also managed to tidy up the place and throw away stuff that I don’t need and can’t be donated. Also, it happened! THE OVEN IS HERE! It arrived on Wednesday and I’m excited to try all the recipes that I’ve been saving for roasted veggies, baked goods etc. But today wasn’t the day: after all the tidying/cleaning I didn’t have any more energy to dive into a baking recipe. So I hereby present you with this recipe for a Chocolate Almond Butter Chia Pudding by AllTheHealthyThings.
Ingredients
¼ cup chia seeds
½ cup almond milk
½ cup canned coconut milk
2 tablespoons cocoa powder
2 tablespoons almond butter
2 tablespoons maple syrup
1 teaspoon vanilla extract
¼ teaspoon cinnamon
Method
Whisk together all of the ingredients except the chia seeds.
Add the chia seeds and whisk again until well combined.
Pour the mix into a glass storage container and place it in the refrigerator. After a few minutes, give it another stir to make sure everything is evenly combined.
Leave the chia pudding in the fridge overnight. In the morning give it a good stir and then top it with fresh berries, your favorite granola, and nut butter.
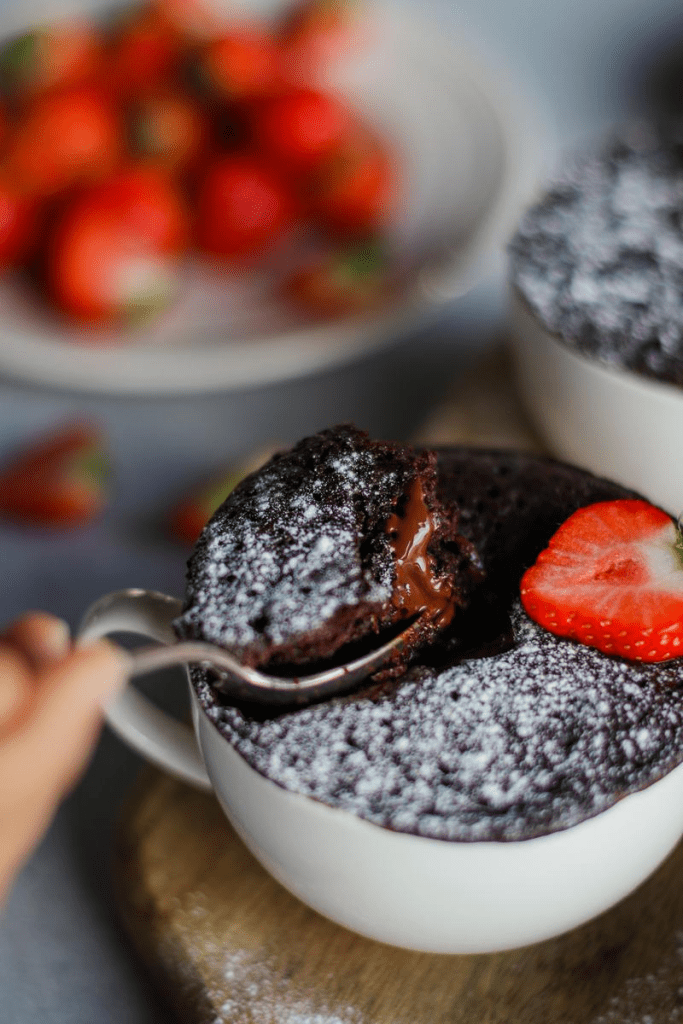
Hey lovely peeps! How are you enjoying this weekend? I was working yesterday and the week has just been mental, non-stop, 2 meetings to attend (one very interesting with potential for a big community project!) and 2 events – ooft, I would need a week to recover and not just one day (when will we go for a 4-day week instead of 5-day?!?). But I also managed to see a good friend for a beautiful foraging walk and helped a lot to recharge the spirit! And still no oven in the new place, but you know me and my sweet tooth so I am here to present you the perfect mug-cake recipe: Double Chocolate Mug Cake by PickUpLimes.
In a large microwave-safe mug, mix together the flour, cocoa powder, sugar, baking powder, and salt.
Then add the milk, oil, and vanilla. Mix until just combined. Be careful not to over-mix.
Using your fingers, press half of the chocolate into the middle of the cake batter in your mug. This is so you have some melted chocolate in the centre of your cake (yum!). Add the other half of the chocolate to the top of the batter.
Microwave on high (800 – 900 W) for 2 minutes*, or until a toothpick inserted into the centre comes out clean. If the cake isn’t cooked through yet, place it back in the microwave at intervals of 15 seconds.
Let the mug cake cool slightly, add your desired toppings, and enjoy!