Recipe Sunday – EASY Instant Pot Red Lentil Curry

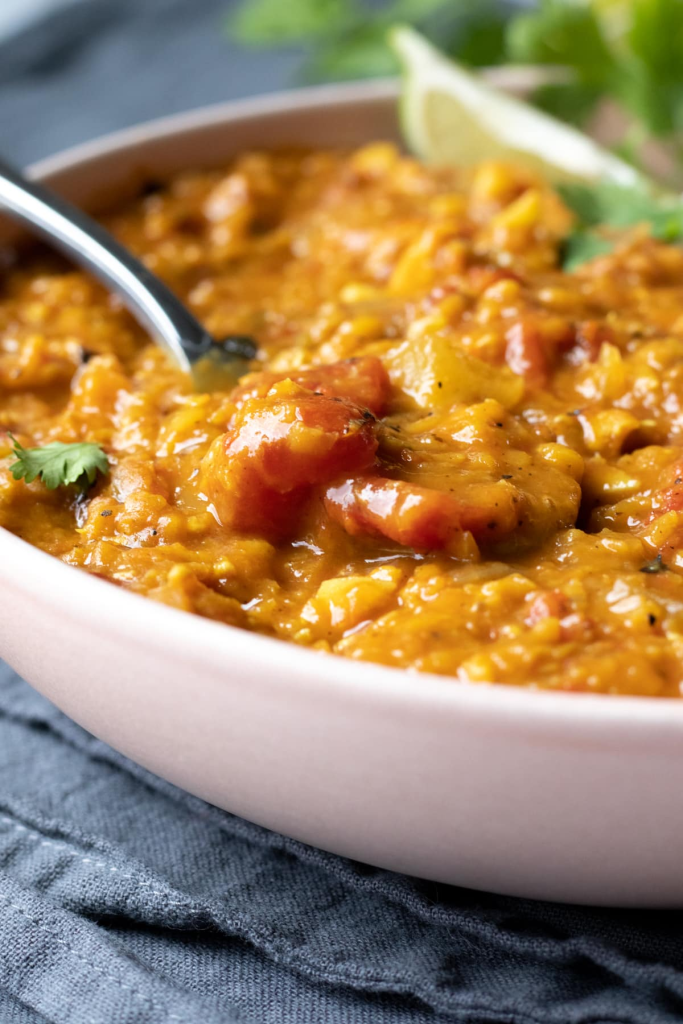
Hello beauties! It’s been another manic week, there are so many things to do and time just flies! But I’m trying not to panic and my “word of the year” which is balance for me this year, is always with me. So, having nice, comforting food is a must especially in this time, and this Easy Instant Pot Red Lentil Curry by MyQuietKitchen is exactly what I need to get me through these busy days.

Easy Instant Pot Red Lentil Curry by MyQuietKitchen

Ingredients 

  • 1 large yellow onion, chopped
  • 4 to 6 cloves garlic, minced
  • 1 thumb size piece of fresh ginger, peeled and zested or minced
  • 1 (14 ounce) can light coconut milk
  • 1 (28 ounce) can diced tomatoes
  • 1 ¼ cups dry red lentils
  • 2 cups soy curls or 1 cup TVP
  • 1 heaping tablespoon mild curry powder
  • 1 teaspoon cumin
  • 1 tablespoon tamari (for GF) or soy sauce
  • 1 teaspoon fine sea salt
  • black pepper
  • 2 ¼ cups water

Method 

  1. Note: to avoid a burn warning on the Instant Pot it’s important to measure accurately and avoid major adjustments to the the wet/dry ratio.
  2. Combine all ingredients in the Instant Pot (onion – water), and stir very well. If using soy curls/TVP, these go in dry; no need to soak first. Lock on the lid, set to sealing, and cook on high pressure for 5 minutes.
  3. Carefully flip the toggle to manually release the pressure. Serve with rice or potatoes, a squeeze of lime juice, and fresh cilantro, if desired. Lentil curry is also great with a dollop of plain vegan yogurt.

I hope you’ll find this recipe as delicious as I do!

Love,

TVCL xx

Recipe Sunday – Raw Vegan Hemp Seed Brownies

Hello beauties! How are you? The past few days have been so busy with my parents visiting: the last time they managed to come it was almost 6 years ago and I moved a couple of times since then so there has been a lot of exploring for them and it’s been just lovely! And with this busy time (still no oven!), I wanted a quick sweet to make hence these Raw Vegan Hemp Seed Brownies by RunningOnRealFood – delicious quick dessert for this busy and warm time. Here is the recipe

Raw Vegan Hemp Seed Brownies by RunningOnRealFood

Ingredients

For the Brownies

For the Chocolate Ganache

Method

  1. Add the walnuts to a food processor and blend into a grainy consistency. It’s ok if there are some larger pieces left behind but they should be mostly broken down.
  2. Add the rest of the brownie ingredients and blend again, starting with 2 tbsp of water, until you have a thick sticky dough. You should be able to press it together into a ball between your fingers. If needed, add the additional tablespoon of water and blend again.
  3. Line a 7 or 8-inch square baking pan with parchment paper so it sticks out over the edges of the pan. This will make it easy to lift the finished brownies from the pan. Firmly press the dough into the pan, taking time to work it into all the corners and even the surface.
  4. Melt the chocolate chips in a microwave-safe bowl in the microwave or by using a double boiler. If using the microwave, stir every 15-20-seconds until they’re mostly melted and you can mix to melt in any remaining chocolate chips. Add the coconut milk or cream and stir until fully combined and smooth.
  5. Spread the ganache over the brownies, smoothing with a spatula or the back of a wooden spoon.
  6. Top Brownies with Ganache: Spread the ganache over the brownies, smoothing with a spatula or the back of a wooden spoon.
  7. Freeze: Place the pan in the freezer for 1-2 hours or until the ganache is firm. 
  8. Slice: Lift the brownies out of the pan using the edges of the parchment paper. Slice into 16 squares and enjoy. Store remaining brownies are best stored in the freezer.

I hope you’ll enjoy them!

Love,

TVCL xx

Recipe Sunday – Blackened Tofu Tacos with Caramelized BBQ Onions

Hello beauties and Happy Sunday! How is it in your neck of the woods? Here it’s been another busy week, especially at work, it has been non-stop and have been on cat-feeding duties for my ex-neighbours for now two weeks. On top of it, I still have boxes to be unboxed, but I’m getting there and the oven should arrive in a couple of weeks! Also, next Thursday my parents will come to visit and while it will only be 4 days, I really can’t wait! So, loads of positives. As it has been so busy, I haven’t been cooking as much as I used to before the move but still want something flavourful and quick for my lunch on weekdays (I don’t want to make pasta all the time or sandwiches). These Blackened Tofu Tacos with Caramelized BBQ Onions by VeganRicha have saved me a lot of time and are just amazing!

Blackened Tofu Tacos with Caramelized BBQ Onions by VeganRicha

Ingredients

For the tofu:

  • 14 ounces (400 g) firm or extra firm tofu pressed for at least 15 minutes and cubed
  • 1 teaspoon soy sauce or use tamari for gluten-free
  • 1 teaspoon oil

For the blackening spice:

  • 2 teaspoons smoked paprika
  • 2 teaspoons onion powder
  • 1 teaspoon garlic powder
  • 1 teaspoon ground cumin
  • 1 teaspoon dried thyme
  • 1/2 teaspoon cayenne or chili powder blend
  • 1/2 teaspoon of salt
  • 1/2 teaspoon of black pepper

For the BBQ onion topping:

  • 1 teaspoon oil
  • 1/2 cup of onion
  • A good pinch of salt and pepper
  • 1 tablespoon BBQ sauce
  • 1 teaspoon hot sauce

For the rest of the tacos:

  • lime juice as needed
  • 2 cups of chopped lettuce or cabbage as needed
  • vegan ranch or vegan sour cream as needed
  • tortillas as needed Glutenfree as desired

Method

  1. Press and cube the tofu if you haven’t already. Then add to a bowl. Add the soy sauce and 1 teaspoon oil and toss well to coat.
  2. In another small shallow bowl, mix all the spices then sprinkle the spices over the tofu and toss well to coat.
  3. Heat a large skillet over medium-high heat.Add 2 teaspoons of oil and let the oil heat up then add in your spiced tofu.
  4. Cook for 7-10 minutes or until the tofu is golden, is crispy on most of the edges.
  5. You might want to be careful with the end of cooking so as to not burn the spices.
  6. Make the BBQ onions: Heat the oil in a medium skillet over medium heat. Add the onion and a pinch of salt and pepper and cook until the onion is golden. 7-8 mins. Stir occasionally.
  7. Then add in your BBQ sauce and hot sauce and toss well to coat then take off heat.
  8. To assemble tacos, warm your tortillas on a gas stove or a pan then layer a layer of lettuce. Add a good helping of the tofu.
  9. Squeeze some lime juice over the tofu then top it with the BBQ onions, more lettuce, and vegan ranch, or sour cream as needed.
  10. Repeat for all your tacos and serve immediately.

They are really delicious and I hope you’ll enjoy them as much as I did!

Love,

TVCL xx

Recipe Sunday – Easy Coffee Overnight Oats

Happy Sunday, my cats! How are you? Are you enjoying your Summer? Here we’re having some clammy days, but at least today it was windy so it took away a bit of the dampness and my daily walk was more pleasant. Usually, on a Sunday I would make something sweet for the week like muffins, cookies etc: however, I still don’t have an oven at the new place so I am not able to bake. Does this mean that I can’t have a homemade sweet to enjoy during the week? Absolutely not! I’m not defeated that easily. As you’ve seen in a couple of past posts (here and here), there are delicious solutions to have easy and quick oven-free recipes! This week, I am sharing an amazing recipe to get your day start properly: Easy Coffee Overnight Oats by ForkfulPlants.

Ingredients  

  • 40 g oats (~½ cup)
  • 15 g chia seeds (~1½ tbsp)
  • 80 ml brewed coffee (⅓ cup)
  • 125 ml almond milk (½ cup)
  • 60 g plain dairy-free yoghurt (⅓ cup)
  • ½ tsp vanilla extract optional
  • 1-2 tsp maple syrup optional

Method 

  1. In a mason jar or bowl, add the oats, chia seeds, brewed coffee, almond milk, yoghurt, vanilla (if using) and maple syrup (if using).
  2. Mix really well until it’s all combined, then cover and move to the fridge.
  3. Leave to thicken overnight, or for a minimum of 3 hours.
  4. To enjoy your oats the next morning, you can top them with some more yoghurt and some chopped nuts or seeds.

You can make it every night and it really takes just a few minutes: easy, quick, delicious and nutritious! I hope you’ll enjoy it as much as I do.

Love,

TVCL xx

Recipe Sunday – Vegetarian Stir-fry with Soya Granules

Hello beautiful kittens! I hope you had an enjoyable weekend! Here, I’ve been working on my new bedroom, which is still basically in boxes – I want to go through the contents of each one because I didn’t manage to do this before packing. But I am quite happy with what I have done today as I got rid of a few things and the place is a bit tidier. Slow but steady. So, being that I am still very busy with the aftermath of the move, I am still seeking easy and quick recipes. And one of these is this Vegetarian Stir-fry with Soya Granules by WhereIsMySpoon: perfect recipe for when half of your kitchenware is still away in boxes!

egetarian Stir-fry with Soya Granules by WhereIsMySpoon

ngredients 

  • 150 g/ 5.3 oz/ 2 cups soya granules
  • 700 ml/ 23.6 fl.oz/ 3 cups vegetable broth
  • 2 garlic cloves
  • 2.5 cm/ 1 inch ginger
  • 1 medium onion
  • 2 medium zucchini
  • 2 carrots
  • 2 red bell peppers
  • 2 scallions
  • 150 g/5.4 oz green beans defrosted, if frozen
  • 1 tablespoon vegetable oil
  • 5 tablespoons soy sauce
  • 2 tablespoons chili sauce
  • 2 teaspoons sriracha or more chili sauce
  • fine sea salt and pepper

Method

  1. Cover the soy granules with the vegetable broth and bring to a boil. Turn off the heat and let stand for about 10 minutes. Drain and squeeze out the excess liquid.
  2. Chop the ginger and garlic very finely and pound to a paste.
  3. Slice the onions finely. Cut the zucchini in half lengthwise and slice the halves. Cut the bell peppers and the carrots into fine strips. Cut the green beans in two or three pieces, depending on their size. Slice the scallions thinly, but keep the whites and the greens separated.
  4. Mix the soya sauce, chili sauce, and sriracha.
  5. Heat the oil and saute the ginger-garlic paste for about 1 minute until fragrant. Add the onions and fry until slightly translucent. Add the rest of the vegetables, except the greens of the scallions, and stir fry for about 5-6 minutes until they are starting to get softer.
  6. Add the soy granules and stir fry for about 2 minutes.
  7. Add the sauce, salt, and pepper to taste and let everything get hot, about 2-3 minutes.
  8. Sprinkle the stir-fry with the chopped scallion greens.
  9. Serve with rice or noodles.

I hope you’ll enjoy it!

Love,

TVCL xx

Recipe Sunday – Raw Vegan Brownie Bites

Happy Sunday, my beauties! Apologies for the radio silence, but it’s been really hectic in the past couple of weeks: I moved home and all my non-working time was spent in boxing, cleaning, and moving stuff for several days. When I knew I had to move, I had a month to prepare and since my flat was only one bedroom, I thought I could do each week a different room. It started well, but then I realised I had to use every day some items from each room and so I had to change strategy mid-way leaving the everyday items for the last week with the cleaning, powering through the boxing in the third week. I also had the experience of driving a van for the first time! And the last three days before handing the keys, I found out that the stuff I left seems was breeding and multiplying: I would prepare boxes and bags thinking I would only have a couple of carloads to do, and then after having done 2 or 3, more stuff was waiting for me. It’s been a tiring few weeks and there still boxes I have to go through at the new place, but I’m getting there. And my beautiful cat is taking it quite well, but that’s another story. So, with all this chaos I haven’t been able to cook much and wanted the quickest stuff to eat. These Raw Vegan Brownie Bites by TheFull Helping were just the perfect treat!

Raw Vegan Brownie Bites by TheFull Helping

Ingredients

  • 1 cup raw cashews or walnuts
  • 4 tablespoons raw cacao or cocoa powder, plus extra for rolling (if desired)
  • Generous pinch sea salt
  • 1/2 teaspoon vanilla extract (optional)
  • 1 1/2 cups pitted, tightly packed Medjool dates

Method

  1. Place the cashews, cacao powder, and sea salt in a food processor fitted with the S blade. Process for about 30 seconds, or till everything is pretty well ground up.
  2. Add the dates and process for another 1-2 minutes, or until the mixture is evenly combined and sticking together. It should stick together easily when you squeeze a little in your hand.
  3. Shape the “dough” into balls that are about 3/4 – 1 inch thick by rolling it in your palms. If you’d like, transfer extra cacao or cocoa powder to a plate and roll the balls in it to coat.
  4. Store the energy bites in the fridge for 30 minutes, or until ready to eat.

Enjoy!

TVCL, xx

Recipe Sunday – Vegan Quiche

Happy Sunday, my beauties! Last week I was off work, just to catch my breath after some main events at the library and I took the chance to visit a place I really love, by the sea: it takes an hour and a half to get there but the day was just beautiful with a clear sky so it was really an enjoyable journey. It was a perfect day for a walk on the beach! However, I didn’t take into account the very strong wind at the beach and I think I caught a cold. Oh well. I still enjoyed the day, no regrets. I also took the time to see a couple of friends and my energy levels seem to be recharging well. In the meantime, I am also doing the Limpia and I was really craving something comforting for the weekend and while I Skyped with my parents they said they were going to make a quiche: perfect idea! And I remember I saw the recipe for a Vegan Quiche by LovingItVegan and this can be made also without the crust part so it was just ideal. And here I share the recipe: this is the original one, with the pie crust, but you can totally make just the filling as a gluten-free quiche.

Vegan Quiche by LovingItVegan

Ingredients

For the Pie Crust:

  • 1 cup + 2 Tbsp All Purpose Flour (145g)
  • ½ tsp Salt
  • 1 Tbsp White Granulated Sugar
  • ¼ cup Coconut Oil (55g) Solid
  • 4 Tbsp Ice Water

For the Filling:

Instructions

  1. Prepare your pie crust: Add the all purpose flour, salt and sugar to a food processor and mix together. Add the coconut oil and process until crumbly.  Add the ice water and process into a dough.
  2. Place the ball of dough onto a flour dusted surface and roll it out into a giant round that can fit over your 9-inch pie dish. 
  3. Carefully lift it and place it over the pie dish and tuck it in along the sides. Cut off any excess dough hanging over the sides of the dish with a scissors. 
  4. Place the pie crust into the fridge while you work on your filling. 
  5. Preheat the oven to 350°F (180°C).
  6. Prepare your filling: Add the tofu, cornstarch, nutritional yeast, turmeric, onion powder, garlic powder, salt and black salt (aka kala namak) into your food processor. Process until well mixed. Add the soy milk and process again until it reaches a smooth consistency. Set aside. 
  7. Add the olive oil to a pot along with the chopped onion and crushed garlic and sauté until the onions are softened. 
  8. Add the sliced mushrooms and sauté with the onions until the mushrooms are softened. 
  9. Add the chopped baby spinach and sauté until just wilted. 
  10. Now add in your tofu mix from the food processor and fold it in with the mushrooms and spinach. 
  11. Add the filling to your pie crust and smooth it down evenly. 
  12. Place it into the oven and bake uncovered for 40 minutes until firm and golden on top. 
  13. Allow to cool for 10 minutes before slicing and serving.
  14. Quiche can be served either warm or cold. 

I’m sure you’ll love it!

Talk soon,

TVCL xx

Recipe Sunday – Vegan Coconut Cups, No-Bake Dessert

Hello cuties! How are you? Here we’re having some really hot weather – today it got to 23° C! And with this weather I am not too bothered with baking, but my sweet tooth always craves something sweet so I found this delicious recipe, really really easy to make and extra tasty – here is the recipe for Vegan Coconut Cups by Elavegan.

Ingredients 

Chocolate Layer:

Coconut Layer:

Method 

Chocolate Layer

  • Process the ingredients for the chocolate layer in your food processor for about 10 seconds or until the mixture is crumbly and slightly sticky.
  • Transfer the dough to a muffin pan (I recommend using a silicone mold) and press it down firmly. Check the step-by-step photos above in the blog post.

Coconut Layer

  • Blend all the ingredients for the coconut layer in your blender for some seconds. You can also use a food processor as I did.
  • Spoon the filling onto the chocolate layer and slightly press it down. Put the pan in the freezer for at least one hour to set. Store the coconut cups in the fridge (for up to 5-6 days) or in the freezer (for up to 2 months). Let them thaw for about 20 to 30 minutes before serving.

I hope you’ll find this recipe as delicious as I found it!

Love,

TVCL xx

Recipe Sunday – Wild Rice and Watercress Salad

Hello beautiful kittens! How are you? It’s the Spring Bank Holiday, meaning that many in the UK had a Monday off: I’m one of those lucky people and it’s been lovely being able to have a little rest, mostly reading and spending some time in the garden (but not too long because it’s really warm). And I didn’t post yesterday, but I’m here to propose a Recipe-Sunday-on-a-Monday! As the weather has been really sunny, I have been eating more fruit and salads, so here is one recipe I love making, a Wild Rice and Watercress Salad by TheVegSpace.

Wild Rice and Watercress Salad by TheVegSpace

Ingredients  

  • 250 g pack microwaveable Long Grain & Wild Rice
  • 8 asparagus spears cut into two pieces
  • 5 radishes finely sliced
  • 1 spring onion finely sliced
  • 60 g watercress
  • 25 g parsley finely chopped
  • 1 lemon juice only
  • 3 tablespoon french dressing
  • 2 tablespoon pine nuts
  • 2 tablespoon pumpkin seeds

Method 

  1. Cook the rice according to packet instructions, then tip into a large bowl and spread around to cool.
  2. Meanwhile, bring a small saucepan of water to the boil, and add the asparagus. Cook for 3 minutes until just turning tender. Drain and add to the bowl with the rice.
  3. Add all the remaining ingredients, and toss together until everything is fully coated with the dressing. Taste and season with a little salt if required.
  4. Divide between two plates and serve immediately. (NB. If you are preparing this in advance, eg, to take to work in a lunchbox, leave the lemon juice and dressing off until you are about to eat it, or else the watercress will turn soggy and unpleasant).

I hope you’ll enjoy it!

Love,

TVCL xx

Recipe Sunday – Healthier Vegan Flapjack

Hello beauties! Are you enjoying your weekend? Here, it’s just been a lovely one, went to a local market yesterday with many nice local artisans. And I couldn’t believe it, but there were two stands totally vegan! While I am doing the Limpia at the moment, I had to take a couple of things from both of them and put them in the freezer so that I’ll be able to enjoy them after I finish the cleanse. And they should be back for another market in a few months. Really looking forward to it! As I am currently not eating things like pasta, bread, pasta, etc. I wanted something sweet that I could enjoy now and these Healthier Vegan Flapjacks by LazyCatKitchen are just perfect! Can have them for breakfast or for a quick snack. So, here is the recipe.

Healthier Vegan Flapjacks by LazyCatKitchen

Ingredients

  • 120 g / ½ cup peanut butter (or other nut or seed butter)
  • 160 ml / 2/3 cup maple syrup
  • 85 g / 1/3 cup mashed ripe banana (1 largish banana)
  • ¼ tsp baking soda
  • ¼ tsp fine salt
  • 350 g / 3½ heaped cups large rolled oats* (GF certified if needed)

Topping (optional)

Method

  1. Preheat the oven to 170° C / 340° F (no fan) oven and line a 20 cm / 8″ square baking tin (or similar) with baking paper.
  2. Combine peanut butter and maple syrup in a mixing bowl, until the mixture is smooth and homogenous. I like to use a wire whisk for that.
  3. Next, mix in well mashed banana, baking soda and salt.
  4. Finally add in the oats. Stir until all the oats are evenly coated in the mixture and the ‘dough’ is sticky but not overly wet – if it’s too wet, add a little bit more oats (this can happen especially when using cups to measure the oats).
  5. Transfer the mixture to the prepared baking tray. Compress the mixture really well to make sure the bars hold together after baking – using an upside down glass is a good way.
  6. Bake for about 30 minutes, until the oats start turning golden brown around the edges but resist the temptation to overbake as it will make the bars dry and crumbly.
  7. Remove from the oven, compress the bars lightly again while warm.
  8. OPTIONAL: Melt the chocolate over a water bath if using. Drizzle over the cooled bars.
  9. Allow the bars to cool down completely and allow the chocolate topping to set before cutting with a sharp knife. Store in an airtight container, at room temperature, for up to a week.

I hope you’ll enjoy them!

Love,

TVCL xx