Recipe Sunday – Spinach Casserole with Lentils & Quinoa

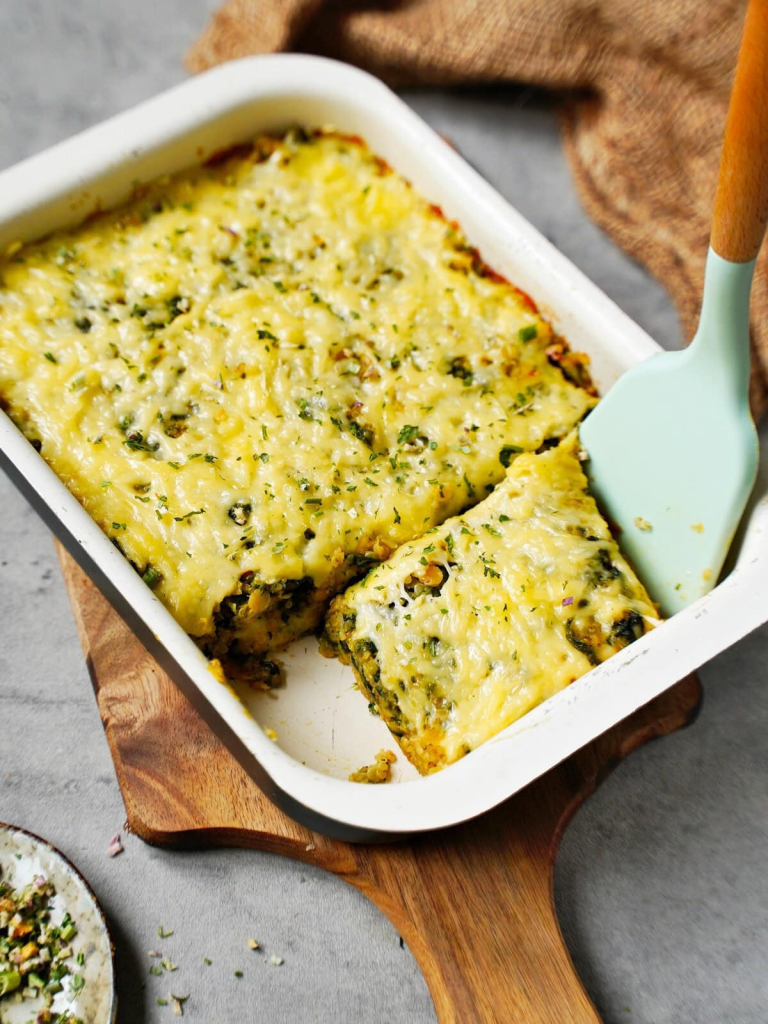
Happy Sunday, beautiful kittens! Are you having a nice weekend? Currently, I am writing this in a hotel room as I will be attending a conference tomorrow and Tuesday – quite anxiously as well as I will be talking at said conference: I am going to deliver a workshop which is something I usually do online, but this is the first time I will do it in person. Wish me luck! After this, I will be off for the rest of the week and while I have a couple of things planned (i.e. taking my cat to the vet; spring/summer cleaning), I am going to take it as easy as possible. Last week was also another busy week and this Spinach Casserole with Lentils and Quinoa by ElaVegan was a great quick dinner and lunch that I am sure you will enjoy too!

Spinach Casserole with Lentils and Quinoa by ElaVegan

Ingredients 

  • 150 g (3/4 cup) dry quinoa or rice
  • 150 g (3/4 cup) dry red lentils
  • 1/2 Tbsp oil
  • 1 medium onion chopped
  • 400 g (14.1 oz) frozen spinach thawed
  • 1 tsp ground paprika
  • 1/2 tsp ground cumin
  • 1/2 tsp ground coriander
  • 1/2 tsp garlic powder
  • 1/4 tsp ground turmeric
  • Salt & pepper to taste
  • 180 ml (3/4 cup) dairy-free cream or canned coconut milk
  • 125 g (1 1/2 cups) vegan cheese shredded

Instructions 

  1. You can watch the video in the post for visual instructions. First, rinse, then transfer the quinoa or rice to a large saucepan, cover it with plenty of boiling water, and cook it for 2-3 minutes.
  2. Then add the red lentils and simmer until both are tender. Don’t overcook them as they’ll continue to cook while in the oven.
  3. Also, preheat the oven to 356 °F/180 °C and lightly oil a 9×9 inch (23×23 cm or similar size) casserole dish. Then, peel and finely chop the onion.
  4. Meanwhile, preheat the oil in a large skillet or pot over medium heat. Once hot, sauté the onion for 3-4 minutes, then add the thawed spinach and cook until it’s heated through and the excess liquid has evaporated.
  5. Transfer the cooked quinoa and red lentil mixture and the chopped spinach mixture to the prepared baking dish. Add all the spices and the dairy-free cream (or coconut milk) and stir well.
  6. Sprinkle over the vegan shredded cheese, then transfer to the oven for 20-25 minutes or until the cheese is bubbly, melted, and slightly golden around the edges.
  7. Finally, remove the spinach quinoa casserole from the oven and leave it to cool for a few minutes before serving.

Enjoy!

Love,

TVCL xx

Recipe Sunday – Cauliflower Curry Vegan Grill Recipe

Hi beautiful cats! How has your week been? Have you been enjoying your weekend? I was working yesterday, but enjoyed a short walk at lunchtime as it was a sunny yet cold day. At this point I consider a “busy week” if I have more than three extra things happening: this week, I went to my first KCR session (Kinetic Chain Release – I am trying everything to ease the pain in my back), took the car for the MOT and went to a boxing class yesterday just before work (it was a lot of exercise, though I’ve been doing Taekwondo three times a week for two years now, I wasn’t prepared for all the running/strength training etc., but probably will go back). Keeping my mind off things, from work to the usual International affairs (the latest being the U.S. as the only Country opposing the State of Palestine becoming a full member of the U.N.) while also being on day 14 of the Limpia, I wanted something easy, tasty and Limpia-friendly: so this recipe for Cauliflower Curry Vegan Grill by VeggiesSavesTheDay was perfect!

Cauliflower Curry Vegan Grill by VeggiesSavesTheDay

Ingredients

For the yogurt sauce:

  • 1 cup plain nondairy yogurt
  • 2 Tablespoons chopped cilantro
  • 2 Tablespoons thinly sliced scallions
  • 1 Tablespoon lime juice
  • ½ teaspoon onion powder
  • ½ teaspoon lime zest
  • ¼ teaspoon salt

For the cauliflower curry:

  • 1 pound cauliflower florets, chopped into bite-sized pieces
  • 1 pound russet potatoes, diced
  • 1 cup chopped white onion
  • 1 cup halved cherry tomatoes
  • 1 cup frozen green peas, defrosted
  • 1 can chickpeas, drained and rinsed (15 ounces)
  • 1½ Tablespoons melted coconut oil, (or substitute olive oil)
  • 1½ Tablespoons curry powder
  • pinch of salt
  • dash of pepper
  • 1 Tablespoon lemon juice

Method

To make the yogurt sauce:

  1. Place all the yogurt sauce ingredients in a small mixing bowl, and stir until combined. Refrigerate until ready to serve.

To make the cauliflower curry:

  1. Preheat the grill to roughly 400ºF (204ºC). In a very large mixing bowl, place the cauliflower, potatoes, white onions, tomatoes, peas, and chickpeas. Drizzle coconut oil over the top of the veggies, and stir until coated. Add the curry powder and a pinch of salt and pepper, and stir again until evenly coated.
  2. Tear out 4 pieces of aluminum foil that are 12 x 18 inches (30 x 46 cm), and lay them out. Divide the curry cauliflower mixture between the 4 sheets, place it in the middle. Fold the two long sides in toward the middle, and fold the seam together until it hits the filling. Fold the two short sides in, twice, to seal the ends.
  3. Place each packet on the grill and cook for 7 minutes, flip them over and grill for an additional 7 minutes. Carefully, open one packet slightly, and poke the cauliflower and potatoes to see if they are tender. If not, cook until they are.
  4. Once cooked through, place the packets on a cooling rack for 5 minutes before opening and serving.
  5. When the packets are opened, squeeze lemon juice over each one, and top with salt and pepper. Serve packets alongside yogurt sauce and enjoy.

Love,

TVCL xx

Recipe Sunday – Vegan Baked Oatmeal (No Banana!)

Hello beautiful cats! How is your weekend going? Today I managed to do a nice walk – while I am not still feeling 100% (still with a cold that won’t leave!), I wanted to take advantage of the April weather, that in-between Winter and Spring mixture of coldish and warmish, a strong chilly wind with on-and-off sunshine. When I arrived back home I was quite knackered but I enjoyed the rest of the day more knowing that I moved.

While I didn’t have anything ready for when I came back, snack-wise, so I decided to make this Vegan Baked Oatmeal by NoSweatVegan. My goodness! Easy, Quick, and just what I needed and something that will do me for the next couple of breakfasts.

Vegan Baked Oatmeal by NoSweatVegan

Ingredients 

Dry Ingredients

  • 2 cups rolled oats
  • 1 tablespoon ground flax seed
  • 2 teaspoons cinnamon
  • 1 teaspoon baking powder
  • ½ teaspoon salt

Wet Ingredients

  • 1 cup soy milk
  • ½ cup unsweetened applesauce
  • ¼ cup maple syrup
  • 2 tablespoons almond butter
  • 1.5 cups frozen mixed berries

Method 

  1. Preheat the oven to 375F or 190C and lightly spray a 8-inch baking with cooking spray (or line with parchment paper.)
  2. Add all of the dry ingredients to a mixing bowl and whisk to combine.
  3. Add all of the wet ingredients to the bowl (except for the frozen berries) and mix to combine.
  4. Add 1 cup of frozen berries and fold into the batter.
  5. Transfer the batter to the baking dish. Top with the rest of the berries.
  6. Bake for about 30 minutes or until the center is done, then remove from the oven and let cool for 5 minutes. Serve with vegan yogurt, walnuts, another drizzle of maple syrup, or any of your favorite toppings.

Enjoy!

Love,

TVCL xx

Recipe Sunday – Vegan Chocolate Peanut Butter Eggs

Happy Sunday, beautiful cats! I hope you’re having a nice weekend. To be honest, I am enjoying this stormy weather – while walking back from work yesterday, the wind was pushing me a bit and made for a fun walk. And this morning, I spent some time in the garden, with the clouds going so fast in the sky, and I sat reading a book (“Just Another Missing Person” by Gillian McAllister) and drinking my Matcha and Moringa Latte (my own special recipe that I make every Sunday) in the garden. It was very peaceful and the perfect way to start the Sunday.

However, it was during the week that I made something easy and quick and delicious: as I had a short week (what with Easter Monday and Wednesday was my day off) and still felt a bit in holiday mood, I found the recipe for Vegan Chocolate Peanut Butter Eggs by ItDoesntTasteLikeChicken that was just right for a treat for the week (you know when you would like something sweet after dinner, and want it to be satisfying and at the same time not junk food? this is it!).

Vegan Chocolate Peanut Butter Eggs by ItDoesntTasteLikeChicken

Ingredients 

  • ½ cup natural peanut butter
  • ¼ cup powdered sugar
  • ½ teaspoon vanilla extract
  • ¼ teaspoon salt
  • 1 ¼ cups (8.6oz / 245g) vegan chocolate chips

Method 

  1. In a medium bowl mix together the peanut butter, powdered sugar, vanilla extract, and salt to form a dough. The dough should be easy to roll into a ball. If the dough is too dry, add a touch more natural peanut butter. If the dough is too wet add a bit more powdered sugar until you reach the correct texture.
  2. Line a large baking sheet with parchment paper. Take about 1 tablespoon of the peanut butter dough and roll it into a ball. Flatten the ball to about ½ inch thick, use your fingers to pinch it into an egg shape, and then place it on the prepared baking sheet. Repeat with the remaining peanut butter dough to make about 9 peanut butter eggs. Freeze for 30 minutes (or as long as overnight).
  3. Melt the chocolate chips in the microwave in 20-second increments, stopping to stir, and being careful to not burn the chocolate. Alternatively, you can melt the chocolate in a double boiler.
  4. Remove one peanut butter egg from the freezer at a time (they soften very quickly), and use a fork to dip the frozen peanut butter egg into the chocolate, evenly coating it. Let excess chocolate drip off then place it back on the parchment paper-lined tray in the freezer, or on a second tray if preferred. Repeat with all the eggs. If you have leftover chocolate, you can return the chocolate to the microwave to make sure it is melty, then use a fork to drizzle extra chocolate over the eggs for decoration. Chill the eggs in the freezer for 30 minutes or until the chocolate is set. Peel off the paper and enjoy.

I hope you’ll love them as much as I do!

Love,

TVCL xx

Recipe Sunday – Vegan Colcannon Recipe (plus an extra one!)

Hi beauties! How are you? Last week I didn’t manage to write anything – I have a poor two poor excuses for it: it was my Aunty’s birthday and I was really tired from the past week as it had been quite busy between work and trying to have a social life (I went to the hairdresser and then to the opera to see the Carmen with a friend!).

This week has been another busy week and also yesterday was my third Saturday working in a row. Quite tiring. And I also got the umpteenth cold – I am working myself up too much and the Spring doesn’t help.

However, here I am with two recipes, the first one is the Vegan Colcannon by TheEdgyVeg, obviously made last Sunday. Candace is by far in my top 3 favourite YouTubers/bloggers and I enjoy making all her recipes. This one is so delicious, quick and easy, that I am definitely going to make it more than once a year!

Vegan Colcannon by TheEdgyVeg

Ingredients

  • 1½ cups chopped kale, packed
  • 1½ cups chopped green cabbage, packed
  • 4 russet potatoes, peeled and (large) cubed
  • ¼ cup vegan butter or margarine
  • ½-1 cup unsweetened soy milk, warmed
  • 3green onions, chopped
  • ¼ cup chopped parsley (optional)
  • sea salt & pepper

Method

  1. Bring a medium-sized pot of water to a boil.
  2. Next, add chopped cabbage and kale into boiling water and blanch for 1-2 mins, or until bright green in colour. Remove greens with a slotted spoon, and place immediately into an ice water bath.
  3. Next, add your peeled and cubed potatoes and 1½ tsp salt to the same pot of water you cooked the greens in, and bring to a boil. Cover, reduce heat and simmer the potatoes for roughly 15-20 mins, or until tender. When it’s fork tender, drain potatoes and add them back into the pot.
  4. Add vegan butter or margarine, and allow it to melt. Using a potato masher, mash the potatoes until smooth and butter is combined.
  5. Gradually, add warmed soy milk, stirring. Season with salt & pepper to taste.
  6. Add your cabbage and/or kale and stir again to combine.
  7. Serve garnished with additional green onions and/or parsley.

Extra recipe!

The extra recipe is because I also made these during the week and while they didn’t come out as the commercially available Jimmy Dodgers (I didn’t use caster sugar and I am not used to cream) they came out really nice and had them for breakfast as well as for snacks. So here is the recipe for Vegan Jammie Dodger recipe by WallflowerKitchen.

Vegan Jammie Dodger recipe by WallflowerKitchen

Ingredients

  • 120 g / ½ cup vegan butter (suggested Vitalite dairy-free spread)
  • 55 g / ¼ cup caster sugar
  • 180 g / 1 ½ cups plain flour
  • Seedless raspberry jam

Method

  1. In a large bowl, cream together the vegan butter and sugar until smooth.
  2. Add the flour in a small amount at a time and continue to mix the dough until completely smooth and it balls together. If it’s still crumbly, keep mixing.
  3. Briefly kneed the dough and roll into a smooth ball. Wrap in clingfilm and chill in the fridge for 20-30 minutes.
  4. Meanwhile, preheat the oven to 180C / 370F and line a baking sheet with greaseproof paper.
  5. Once the dough has chilled, roll to about ½ cm thickness and cut out your cookie shapes. Use a smaller cutter to make a cut-out centre on half of the cookies.
  6. Transfer to the baking sheet and bake for 10-15 minutes, turning occasionally to ensure even baking. Once they begin to turn slightly golden brown at the edges, they are done.
  7. Leave to cool at room temperature.
  8. Once cooled, add approximately half a tsp of the raspberry jam to each full halves of the cookies and place the cut-out centre cookies on top to create a jam sandwich.

Enjoy!

Love,

TVCL xxx

Recipe Sunday – Pear Almond Torte Tatin

Hello beauties! How are you today? Here we can’t complain – I was speaking at an online conference for International Women’s Day and I had been very nervous for the past few weeks: I was very excited about the invitation and also about sharing my research. But I am not good at all at public speaking, like that’s not my skill. However, I have also been invited to give a workshop with a colleague at an in-person conference in June. So I thought that if I can manage this online one, it will be good prep for the in-person one. Also, at this past online conference I prepared the presentation, I rehearsed it and it was an excellent chance for me to share my research project and my findings.

And you know what? I nailed it! Two of my colleagues were following the event and they both came after my talk to tell me that I did very well, they learned new things and also they gave a hug! The attendees at the conference left many lovely positive comments and one person also suggested that they can help progressing my research. I won’t lie: I was DRAINED after the event, but couldn’t stop because I had another event I had to attend with a colleague (that also went well!). Yesterday I was working too, so such a busy week!

And you know me, even if I’m busy I want something tasty, some kind of comfort food and it has to be easy and quick. I was so lucky to stumble upon this recipe for a Pear Almond Torte Tatin by Miyoko Schinner. I am not a fan of pears, but oh goodness this is such a great recipe! (Also, now the Pear Galette, my go-to recipe with pears, has some competition!)

Pear Almond Torte Tatin by Miyoko Schinner

Ingredients

  • 3-4 pears, sliced
  • 2/3 cup of brown sugar (plus 3-4 tablespoons for the caramelization)
  • 1/2 cup Extra Virgin Olive Oil (plus 2 tablespoons for the caramelization)
  • 1 cup all-purpose flour
  • 3/4 cup almond flour
  • 1 cup almond milk
  • 1 teaspoon vanilla extract
  • 1 tablespoon baking powder

Method

  1. Preheat the oven to 350F/180C;
  2. Prepare an 8-9 in cake pan with a sheet of parchment paper at the bottom;
  3. Brush the 2 tablespoons of olive oil on the paper and sprinkle the 3-4 tablespoons of brown sugar (this will help with caramelization);
  4. Put the pears now: you can fan them out or just set them there without much attention (the fanning will make the end result prettier, but to be honest I just threw them there) and set aside;
  5. Put the half cup of oil with the 2/3 cup of sugar and stir;
  6. Sift the flour with the baking powder then add the almond flour;
  7. Add half of the flour mixture to the oil mixture and stir;
  8. Then add half the milk and whisk well;
  9. Add the rest of the milk and the rest of the flour;
  10. Add the vanilla extract;
  11. Pour the batter over the pears and we’re going to put it in the oven for 25-30 minutes.
  12. Check with a toothpick if it comes out clean. Flip it upside down and let cool.
  13. Enjoy!

Love,

TVCL xx

Recipe Sunday – Roasted Cabbage Steaks

Happy Sunday, cats! How was your week? Here, it has been another fairly busy week, and I am also preparing to speak at an online conference next week (no pressure!). We’re also going to host an event for International Women’s Day on Friday afternoon – so, plenty to do! I haven’t been feeling like trying new recipes, but while I was making my cabbage soup for the weekend, I noticed I had a lot of cabbage so that’s when I decided to try the Roasted Cabbage Steaks by EatSomethingVegan. They didn’t disappoint! Extremely easy to make and a great result. Definitely will make it again, maybe with some basmati rice and a tempeh roast. Will let you know!

Roasted Cabbage Steaks by EatSomethingVegan

Ingredients

  • 2 small cabbage heads
  • 3 tbsp. olive oil
  • ½ tsp. salt or to taste
  • 2 tsp. paprika
  • 1 tbsp. garlic powder

Method

  1. Cut the stems off the cabbage heads and then cut each one in half, then in half again. You should have four flat discs of cabbage that are about ¾ to 1 inch thick from each head. Place the cabbage steaks on a baking sheet that is lined with parchment paper, allowing some space between each one to even cooking.
  2. Brush the cabbage with the olive oil, coating them thoroughly. Then generously sprinkle the salt, garlic powder, and paprika on the cabbage steaks. Flip the cabbage over and repeat, brushing them with oil and sprinkling the seasonings. Then add a pinch of red pepper flakes to each one, if desired.
  3. Bake the cabbage steaks at 400°F for about 25 minutes, until the leaves are browned and the center is tender. Serve hot out of the oven and enjoy!

Love,

TVCL xx

Recipe Sunday – Vegan Orange and Olive Oil Cake

Happy Sunday my kittens, I hope you are well! It’s been a long week and I’m just back from a lovely afternoon: my partner’s sister organised a fundraiser for Palestine, so many lovely people brought delicious food (mostly vegan!) and there were also 2 Palestinian women. It was a great atmosphere despite the horrors that are currently happening in the Middle East, but it showed that many people are not supporting said horrors. Please keep reading about it, and keep talking about it because while you might think that this is something that doesn’t touch you, it actually does, it involves all humans.

Having said this, I wanted to share with you this Vegan Orange and Olive Oil Cake by ConnoiseurusVeg that I just made and it’s one of the easiest and quickest desserts ever! So here is the recipe.

Vegan Orange and Olive Oil Cake by ConnoiseurusVeg

Ingredients

  • ½ cup olive oil
  • ⅓ cup orange juice
  • ⅓ cup unflavored and unsweetened non-dairy milk
  • 1 tablespoon orange zest
  • 1 teaspoon vanilla extract
  • 1 ¾ cup all-purpose flour
  • 1 cup organic granulated sugar
  • 1 teaspoon baking powder
  • ½ teaspoon baking soda
  • ½ teaspoon salt
  • Organic powdered sugar, for serving (optional)

Method

  1. Preheat the oven to 350°F.
  2. Lightly oil and flour the bottom of a 9-inch round cake pan.
  3. In a small container such as a liquid measuring cup, stir together the olive oil, orange juice, milk, orange zest, and vanilla.
  4. Whisk the flour, sugar, baking powder, baking soda, and salt together in a large mixing bowl.
  5. Pour the liquid mixture into the bowl with the dry ingredients and stir the batter until almost all of the lumps are out. It doesn’t need to be perfectly smooth.
  6. Pour the batter into the prepared cake pan.
  7. Bake the cake for about 25 minutes, until a toothpick inserted into the center comes out clean.
  8. Place the pan on a cooling rack and let the cake cool completely.
  9. Once the cake is cool, carefully invert it onto a plate.
  10. Optionally sprinkle the cake with powdered sugar. Slice and serve. (I omitted the sugar)

Enjoy!

Love,

TVCL xx

Recipe Sunday – Spicy Eggplant Pasta

Hi my beautiful cats! I hope you are well. Recently, I haven’t been much active here and there are many reasons:

  • Since December, I’ve had an on-and-off cold: it seemed I got rid of it 2 weeks ago, but it came back with a vengeance. Definitely, it doesn’t help that at work we are still without heating and we are passing these bugs around with my colleagues, like playing tennis with the cold;
  • Despite taking all of my “concoctions” (from tea with turmeric and black pepper, to oregano oil and apple cider vinegar) I can’t quite shake this cold off and I am currently on day 4 of antibiotics – before this, I hadn’t needed antibiotics, for years;
  • I have let the current world events deteriorate my mental health: I am struggling to understand the people defending the criminal actions of the Israeli government and I am really losing hope in the human species. All the NATO/Russia is also not helping.

However, here I am today with some comfort food – I had a single eggplant waiting to be used in the fridge and this Spicy Eggplant Pasta by ConnoisseurusVeg was exactly what I needed.

Spicy Eggplant Pasta by ConnoisseurusVeg

Ingredients

  • 8 ounces dried rigatoni pasta
  • 3 tablespoons olive oil, plus more if needed, divided
  • 1 medium (1 pound or 450 gram) eggplant, salted if necessary, cut into ½ inch cubes
  • 1 medium onion, diced
  • 5 garlic cloves, minced
  • 1 (14 ounce or 400 gram) can diced tomatoes
  • 1 cup canned crushed tomatoes
  • 3 tablespoons capers
  • 1 teaspoon crushed red pepper flakes, or to taste
  • ½ teaspoon salt, plus more to taste
  • ½ cup chopped fresh basil, plus more for serving, optional
  • ¼ cup chopped fresh parsley, plus more for serving, optional
  • Black pepper to taste

Instructions

  1. Bring a large pot of salted water to a boil. Add the pasta and cook it according to the package directions, until al dente. Drain the pasta into a colander when it’s finished cooking.
  2. While the pasta cooks, coat the bottom of a large skillet with 2 tablespoons of olive oil and place it over medium heat. Once the oil is hot, add the diced eggplant in an even layer. (Notes 1 and 2)
  3. Cook the eggplant for about 10 minutes, flipping the pieces only once or twice, until they’re browned on multiple sides.
  4. Remove the eggplant from the skillet and transfer it to a plate when it’s finished browning.
  5. While the eggplant cooks, coat the bottom of a large pot or skillet with the remaining 1 tablespoon of olive oil and place it over medium heat.
  6. When the oil is hot, add the onion. Sweat the onion for about 5 minutes, until soft and translucent, stirring frequently.
  7. Add the garlic and cook for 1 minute more, until very fragrant.
  8. Stir in the diced tomatoes, crushed tomatoes, capers, red pepper flakes, and ½ teaspoon of salt.
  9. Bring the sauce to a simmer, and allow it to cook, uncovered, for about 10 minutes, until it thickens up a bit. You can add a splash of water if it becomes too thick.
  10. Stir the eggplant into the sauce and let the mixture simmer for about 5 minutes more, until the sauce very thick and the eggplant is very tender.
  11. Add the cooked pasta, parsley and basil to the sauce and stir everything well to distribute the ingredients and wilt the herbs.
  12. Remove the pot from heat and season the pasta with additional salt and black pepper to taste.
  13. Divide onto plates and serve. Sprinkle with additional parsley and basil, if desired.

Enjoy!

Love,

TVCL xx

Recipe Sunday – Vegan Quiche With Asparagus

Hello pretties! How are you? Are you having a nice weekend? I have been enjoying a work night-out on Friday (having nice colleagues makes such a difference!), then yesterday my partner’s family had a Secret Santa party which was really good fun and lovely atmosphere (although, as with all the family reunions, I need A LOT of mental preparation – introvert for life…). A very busy, but great weekend! To close this, I wanted to share a recipe I followed this week for a Vegan Quiche with Asparagus by Jo’sKitchenLarder – this week I was short on time so I used puff pastry instead of making the pastry.

Vegan Quiche with Asparagus by Jo’sKitchenLarder

Ingredients

Pastry

  • 250 g plain (all-purpose) flour
  • 125 g unsalted vegan block butter cold and cut into cubes, I like Flora Plant
  • good pinch of salt
  • 2 tablespoon cold water you might not use all of it, depending on your flour

Filling

  • 360 g leeks weight after trimming, cleaned and thinly sliced
  • 350-400 g asparagus woody ends discarded, I used 15 thin asparagus spears for my quiche
  • 300 g silken tofu drained
  • 100 ml soya cream or any plant based cream of choice
  • 2-3 garlic cloves peeled and finely chopped/minced
  • 1 tablespoon (heaped) cornflour or potato starch
  • ½-1 teaspoon black salt (kala namak), regular salt can be used here instead, adjust saltiness as per your liking
  • ½ teaspoon onion powder
  • ½ teaspoon garlic powder/granules
  • ¼ teaspoon turmeric for colour
  • 1 teaspoon dried oregano
  • 2 tablespoon nutritional yeast

Instructions

Pastry

  1. Put flour and cold butter in a bowl of your food processor and pulse until you’ve got sand like consistency. If you don’t have food processor simply use your hands to rub butter and flour together to the same effect.
  2. Add cold water, drop at a time and pulse or mix it in gently with your hands until your dough starts coming together into a ball.
  3. Turn it out onto a floured surface and shape into a disc. Wrap it into wrap of your choice and put in the fridge to chill for at least 15 min.
  4. Preheat the oven to 200C/400F/Gas Mark 6.
  5. Roll out the pastry to fit loose-bottomed tart tin (23-25cm/9-10inch). Line the tin with pastry (bottom and sides) and trim any overhanging bits with the stroke of a knife against the edge of the tin. Save excess pastry for later in case you need to patch any holes.
  6. Line your pastry with baking paper and fill with baking beans to blind bake first. Bake preheated oven for 15min.
  7. Next, remove the paper and beans, patch up any holes with the saved pastry (if necessary) and return (uncovered) to the oven for another 5 minutes.
  8. Once 5 minutes is up take the pastry out of the oven and set aside as you prepare your filling. Lower oven temperature down to 180C/350F/Gas Mark 4.

Filling

  1. Prepare the leeks by trimming the dark green tops, cutting them in half and giving them a clean to ensure there is no grit leftover in between the layers. Slice each half nice and thin.
  2. Heat up some oil in a large frying pan and add sliced leeks followed by minced garlic. Fry them stirring occasionally until nice and softened but not too coloured.
  3. In the meantime, put tofu in a sieve over a bowl or a sink to drain the excess water.
  4. Next, place the tofu and all of the herbs, spices, soya cream and cornflour in a bowl of food processor and mix until nice and smooth. You can also do it by hand mashing and mixing everything with a fork, although food processr will definitely give you smoother consistency.
  5. Once the leeks are nice and soft and tofu mixture ready, mixed them togetherand and transfer into pre-baked pastry case.
  6. Arrange trimmed asparagus spears on top as per your liking and bake your quiche in preheated oven (temperature lowered to 180C/350F/Gas Mark 5)) for approx. 30-40 minutes until set.
  7. Take the quiche out of the oven and let it cool down in a tin for a bit before slicing and serving.

Enjoy!

Love,

TVCL xx