Recipe Sunday – Vegetarian Stir-fry with Soya Granules

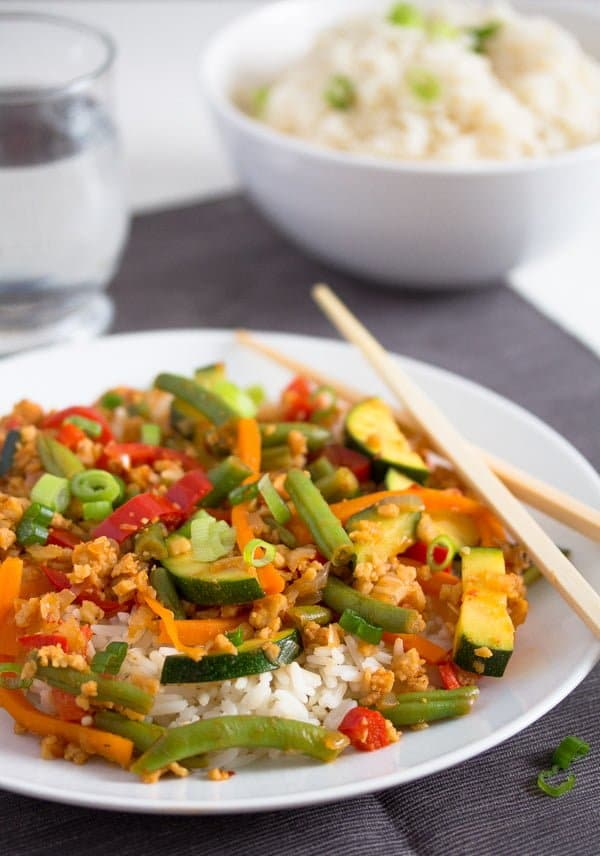
Hello beautiful kittens! I hope you had an enjoyable weekend! Here, I’ve been working on my new bedroom, which is still basically in boxes – I want to go through the contents of each one because I didn’t manage to do this before packing. But I am quite happy with what I have done today as I got rid of a few things and the place is a bit tidier. Slow but steady. So, being that I am still very busy with the aftermath of the move, I am still seeking easy and quick recipes. And one of these is this Vegetarian Stir-fry with Soya Granules by WhereIsMySpoon: perfect recipe for when half of your kitchenware is still away in boxes!

egetarian Stir-fry with Soya Granules by WhereIsMySpoon

ngredients 

  • 150 g/ 5.3 oz/ 2 cups soya granules
  • 700 ml/ 23.6 fl.oz/ 3 cups vegetable broth
  • 2 garlic cloves
  • 2.5 cm/ 1 inch ginger
  • 1 medium onion
  • 2 medium zucchini
  • 2 carrots
  • 2 red bell peppers
  • 2 scallions
  • 150 g/5.4 oz green beans defrosted, if frozen
  • 1 tablespoon vegetable oil
  • 5 tablespoons soy sauce
  • 2 tablespoons chili sauce
  • 2 teaspoons sriracha or more chili sauce
  • fine sea salt and pepper

Method

  1. Cover the soy granules with the vegetable broth and bring to a boil. Turn off the heat and let stand for about 10 minutes. Drain and squeeze out the excess liquid.
  2. Chop the ginger and garlic very finely and pound to a paste.
  3. Slice the onions finely. Cut the zucchini in half lengthwise and slice the halves. Cut the bell peppers and the carrots into fine strips. Cut the green beans in two or three pieces, depending on their size. Slice the scallions thinly, but keep the whites and the greens separated.
  4. Mix the soya sauce, chili sauce, and sriracha.
  5. Heat the oil and saute the ginger-garlic paste for about 1 minute until fragrant. Add the onions and fry until slightly translucent. Add the rest of the vegetables, except the greens of the scallions, and stir fry for about 5-6 minutes until they are starting to get softer.
  6. Add the soy granules and stir fry for about 2 minutes.
  7. Add the sauce, salt, and pepper to taste and let everything get hot, about 2-3 minutes.
  8. Sprinkle the stir-fry with the chopped scallion greens.
  9. Serve with rice or noodles.

I hope you’ll enjoy it!

Love,

TVCL xx

Recipe Sunday – Raw Vegan Brownie Bites

Happy Sunday, my beauties! Apologies for the radio silence, but it’s been really hectic in the past couple of weeks: I moved home and all my non-working time was spent in boxing, cleaning, and moving stuff for several days. When I knew I had to move, I had a month to prepare and since my flat was only one bedroom, I thought I could do each week a different room. It started well, but then I realised I had to use every day some items from each room and so I had to change strategy mid-way leaving the everyday items for the last week with the cleaning, powering through the boxing in the third week. I also had the experience of driving a van for the first time! And the last three days before handing the keys, I found out that the stuff I left seems was breeding and multiplying: I would prepare boxes and bags thinking I would only have a couple of carloads to do, and then after having done 2 or 3, more stuff was waiting for me. It’s been a tiring few weeks and there still boxes I have to go through at the new place, but I’m getting there. And my beautiful cat is taking it quite well, but that’s another story. So, with all this chaos I haven’t been able to cook much and wanted the quickest stuff to eat. These Raw Vegan Brownie Bites by TheFull Helping were just the perfect treat!

Raw Vegan Brownie Bites by TheFull Helping

Ingredients

  • 1 cup raw cashews or walnuts
  • 4 tablespoons raw cacao or cocoa powder, plus extra for rolling (if desired)
  • Generous pinch sea salt
  • 1/2 teaspoon vanilla extract (optional)
  • 1 1/2 cups pitted, tightly packed Medjool dates

Method

  1. Place the cashews, cacao powder, and sea salt in a food processor fitted with the S blade. Process for about 30 seconds, or till everything is pretty well ground up.
  2. Add the dates and process for another 1-2 minutes, or until the mixture is evenly combined and sticking together. It should stick together easily when you squeeze a little in your hand.
  3. Shape the “dough” into balls that are about 3/4 – 1 inch thick by rolling it in your palms. If you’d like, transfer extra cacao or cocoa powder to a plate and roll the balls in it to coat.
  4. Store the energy bites in the fridge for 30 minutes, or until ready to eat.

Enjoy!

TVCL, xx

Recipe Sunday – Vegan Quiche

Happy Sunday, my beauties! Last week I was off work, just to catch my breath after some main events at the library and I took the chance to visit a place I really love, by the sea: it takes an hour and a half to get there but the day was just beautiful with a clear sky so it was really an enjoyable journey. It was a perfect day for a walk on the beach! However, I didn’t take into account the very strong wind at the beach and I think I caught a cold. Oh well. I still enjoyed the day, no regrets. I also took the time to see a couple of friends and my energy levels seem to be recharging well. In the meantime, I am also doing the Limpia and I was really craving something comforting for the weekend and while I Skyped with my parents they said they were going to make a quiche: perfect idea! And I remember I saw the recipe for a Vegan Quiche by LovingItVegan and this can be made also without the crust part so it was just ideal. And here I share the recipe: this is the original one, with the pie crust, but you can totally make just the filling as a gluten-free quiche.

Vegan Quiche by LovingItVegan

Ingredients

For the Pie Crust:

  • 1 cup + 2 Tbsp All Purpose Flour (145g)
  • ½ tsp Salt
  • 1 Tbsp White Granulated Sugar
  • ¼ cup Coconut Oil (55g) Solid
  • 4 Tbsp Ice Water

For the Filling:

Instructions

  1. Prepare your pie crust: Add the all purpose flour, salt and sugar to a food processor and mix together. Add the coconut oil and process until crumbly.  Add the ice water and process into a dough.
  2. Place the ball of dough onto a flour dusted surface and roll it out into a giant round that can fit over your 9-inch pie dish. 
  3. Carefully lift it and place it over the pie dish and tuck it in along the sides. Cut off any excess dough hanging over the sides of the dish with a scissors. 
  4. Place the pie crust into the fridge while you work on your filling. 
  5. Preheat the oven to 350°F (180°C).
  6. Prepare your filling: Add the tofu, cornstarch, nutritional yeast, turmeric, onion powder, garlic powder, salt and black salt (aka kala namak) into your food processor. Process until well mixed. Add the soy milk and process again until it reaches a smooth consistency. Set aside. 
  7. Add the olive oil to a pot along with the chopped onion and crushed garlic and sauté until the onions are softened. 
  8. Add the sliced mushrooms and sauté with the onions until the mushrooms are softened. 
  9. Add the chopped baby spinach and sauté until just wilted. 
  10. Now add in your tofu mix from the food processor and fold it in with the mushrooms and spinach. 
  11. Add the filling to your pie crust and smooth it down evenly. 
  12. Place it into the oven and bake uncovered for 40 minutes until firm and golden on top. 
  13. Allow to cool for 10 minutes before slicing and serving.
  14. Quiche can be served either warm or cold. 

I’m sure you’ll love it!

Talk soon,

TVCL xx

Recipe Sunday – Vegan Coconut Cups, No-Bake Dessert

Hello cuties! How are you? Here we’re having some really hot weather – today it got to 23° C! And with this weather I am not too bothered with baking, but my sweet tooth always craves something sweet so I found this delicious recipe, really really easy to make and extra tasty – here is the recipe for Vegan Coconut Cups by Elavegan.

Ingredients 

Chocolate Layer:

Coconut Layer:

Method 

Chocolate Layer

  • Process the ingredients for the chocolate layer in your food processor for about 10 seconds or until the mixture is crumbly and slightly sticky.
  • Transfer the dough to a muffin pan (I recommend using a silicone mold) and press it down firmly. Check the step-by-step photos above in the blog post.

Coconut Layer

  • Blend all the ingredients for the coconut layer in your blender for some seconds. You can also use a food processor as I did.
  • Spoon the filling onto the chocolate layer and slightly press it down. Put the pan in the freezer for at least one hour to set. Store the coconut cups in the fridge (for up to 5-6 days) or in the freezer (for up to 2 months). Let them thaw for about 20 to 30 minutes before serving.

I hope you’ll find this recipe as delicious as I found it!

Love,

TVCL xx

Recipe Sunday – Wild Rice and Watercress Salad

Hello beautiful kittens! How are you? It’s the Spring Bank Holiday, meaning that many in the UK had a Monday off: I’m one of those lucky people and it’s been lovely being able to have a little rest, mostly reading and spending some time in the garden (but not too long because it’s really warm). And I didn’t post yesterday, but I’m here to propose a Recipe-Sunday-on-a-Monday! As the weather has been really sunny, I have been eating more fruit and salads, so here is one recipe I love making, a Wild Rice and Watercress Salad by TheVegSpace.

Wild Rice and Watercress Salad by TheVegSpace

Ingredients  

  • 250 g pack microwaveable Long Grain & Wild Rice
  • 8 asparagus spears cut into two pieces
  • 5 radishes finely sliced
  • 1 spring onion finely sliced
  • 60 g watercress
  • 25 g parsley finely chopped
  • 1 lemon juice only
  • 3 tablespoon french dressing
  • 2 tablespoon pine nuts
  • 2 tablespoon pumpkin seeds

Method 

  1. Cook the rice according to packet instructions, then tip into a large bowl and spread around to cool.
  2. Meanwhile, bring a small saucepan of water to the boil, and add the asparagus. Cook for 3 minutes until just turning tender. Drain and add to the bowl with the rice.
  3. Add all the remaining ingredients, and toss together until everything is fully coated with the dressing. Taste and season with a little salt if required.
  4. Divide between two plates and serve immediately. (NB. If you are preparing this in advance, eg, to take to work in a lunchbox, leave the lemon juice and dressing off until you are about to eat it, or else the watercress will turn soggy and unpleasant).

I hope you’ll enjoy it!

Love,

TVCL xx

Recipe Sunday – Healthier Vegan Flapjack

Hello beauties! Are you enjoying your weekend? Here, it’s just been a lovely one, went to a local market yesterday with many nice local artisans. And I couldn’t believe it, but there were two stands totally vegan! While I am doing the Limpia at the moment, I had to take a couple of things from both of them and put them in the freezer so that I’ll be able to enjoy them after I finish the cleanse. And they should be back for another market in a few months. Really looking forward to it! As I am currently not eating things like pasta, bread, pasta, etc. I wanted something sweet that I could enjoy now and these Healthier Vegan Flapjacks by LazyCatKitchen are just perfect! Can have them for breakfast or for a quick snack. So, here is the recipe.

Healthier Vegan Flapjacks by LazyCatKitchen

Ingredients

  • 120 g / ½ cup peanut butter (or other nut or seed butter)
  • 160 ml / 2/3 cup maple syrup
  • 85 g / 1/3 cup mashed ripe banana (1 largish banana)
  • ¼ tsp baking soda
  • ¼ tsp fine salt
  • 350 g / 3½ heaped cups large rolled oats* (GF certified if needed)

Topping (optional)

Method

  1. Preheat the oven to 170° C / 340° F (no fan) oven and line a 20 cm / 8″ square baking tin (or similar) with baking paper.
  2. Combine peanut butter and maple syrup in a mixing bowl, until the mixture is smooth and homogenous. I like to use a wire whisk for that.
  3. Next, mix in well mashed banana, baking soda and salt.
  4. Finally add in the oats. Stir until all the oats are evenly coated in the mixture and the ‘dough’ is sticky but not overly wet – if it’s too wet, add a little bit more oats (this can happen especially when using cups to measure the oats).
  5. Transfer the mixture to the prepared baking tray. Compress the mixture really well to make sure the bars hold together after baking – using an upside down glass is a good way.
  6. Bake for about 30 minutes, until the oats start turning golden brown around the edges but resist the temptation to overbake as it will make the bars dry and crumbly.
  7. Remove from the oven, compress the bars lightly again while warm.
  8. OPTIONAL: Melt the chocolate over a water bath if using. Drizzle over the cooled bars.
  9. Allow the bars to cool down completely and allow the chocolate topping to set before cutting with a sharp knife. Store in an airtight container, at room temperature, for up to a week.

I hope you’ll enjoy them!

Love,

TVCL xx

Recipe Sunday – Potatoes with spinach

Hey kitties! How are you today? It’s been such a long week at work, every day has been busy and my SAD is kicking in. So I needed something good and comforting to keep my spirits high and here we go, I found this recipe by chance and it was exactly was I was looking for! Easy, quick, and absolutely delicious. I couldn’t find a website attached to the YouTube channel, hence I am linking to the video of the recipe for Potatoes and Spinach by WeCookVegan.

Potatoes and Spinach by WeCookVegan

Ingredients :

  • 3 potatoes 250g
  • 250gr (9oz) spinach
  • 300 gr (11oz) extra firm tofu
  • 150ml (5fl oz) dairy free milk of your choice and preference
  • 3tbsp nutritional yeast 2tbsp potato starch
  • 1/2tbsp veg bouillon powder
  • 1/4tsp turmeric powder
  • 1tbsp fresh parsley
  • 1/2tsp dijon mustard

Method:

  1. Dice 3 potatoes.
  2. Pour water and add a little bit of salt. Boil potatoes until fork tender.
  3. Add 1tbsp of water to a deep frying pan. Transfer 250g (9oz) spinach to the pan and wilt. Stir occasionally.
  4. When the spinach will start to shrink and release some water, turn off the heat and drain water.
  5. Add potatoes to a large mixing bowl. Mix potatoes with spinach and set aside.
  6. Time to make tofu mixture. Transfer 300g (11oz) extra firm tofu into a bowl. Pour 150ml (5fl oz) dairy free milk Add 3tbsp nutritional yeast, 2tbsp potato starch, 1/2tbsp veg bouillon powder and 1/4tsp turmeric powder. Blend it well altogether. Chop 1tbsp fresh parsley and add to tofu mixture. Add 1/2tsp dijon mustard. Stir well until all the ingredients are combined.
  7. Pour tofu mixture into potatoes and spinach. Combine well together.
  8. Crumple up the parchment paper in your hands, like a snowball to make it softer. Cover the baking dish (recipe calls for a baking dish size 20x5cm | 8x2inch) and transfer the mixture to the baking dish: spread potato, tofu and spinach mixture evenly. Top up with sliced in half cherry tomatoes (optional).
  9. Bake in the preheated oven at 390F | 200C for 30 minutes or until golden and firm in the centre.
  10. Serve with chutney and enjoy!

I am sure you’ll love it!

Love,

TVCL xx

Recipe Sunday – Vegan Welsh Cakes

Hello kittens! Last week I was away all day on Sunday and didn’t manage to share any recipes with you, but today I have a delicious one that it’s great in every season: Vegan Welsh Cakes by DomesticGothess. I already mentioned them in this post, but haven’t shared the whole recipe. They are so easy and quick that during lockdown I have made them before work! And they work great for breakfast and for snacking. I am sure you’ll like them!

Vegan Welsh Cakes by DomesticGothess

Ingredients

  • 225 g (1 ¾ cups + 2 Tbsp) self-raising flour (or plain flour plus 1 tsp baking powder)
  • ½ tsp mixed spice (pumpkin spice)
  • 110 g (4oz / ½ cup) vegan block butter (Naturli Vegan Block or Stork block) cold and cubed
  • 85 g (⅓ cup + 1 Tbsp) caster (superfine) sugar plus extra for dusting
  • 65 g (2 ⅓ oz) sultanas or currants
  • 2-4 Tbsp non-dairy milk

Method

  1. Place the flour and mixed spice (and baking powder if using plain flour) in a bowl and stir to combine.
  2. Add the cold cubed butter and rub in using your fingertips until the mixture resembles fine breadcrumbs and no lumps of fat remain.
  3. Add the sugar and sultanas or currants and stir through.
  4. Gradually stir in enough milk to bring the mixture together into a ball of dough. Be careful not to add too much, it should be soft but not sticky.
  5. Roll out the dough on a lightly floured surface until it is about 5mm/¼in thick. Cut it into rounds using a 6.5cm/2 ½in to 7.5cm/3in fluted cutter.
  6. Bring the scraps together gently and roll out again to cut out more rounds.
  7. Place a cast iron griddle or heavy bottomed frying pan over a low-medium heat and brush with a small amount of butter. Place some caster sugar in a bowl for dusting.
  8. Cook a few Welsh cakes at a time until golden, about 3 minutes. Then carefully flip them over and cook for about 3 minutes more until golden on both sides and cooked through. They firm up as they cool. Keep a close eye on them, they can go from golden to burnt very quickly!
  9. It can be tricky to get the pan to the right temperature so it is a good idea to cook a test cake first to make sure it’s not too hot.
  10. Once the Welsh cakes are cooked, roll them in the caster sugar while still hot and repeat with the rest of the cakes.

Enjoy!

Love,

TVCL xx

Recipe Sunday – Vegan Yachaejeon (Korean Vegetable Pancakes)

Beautiful kittens, how are you? Last week has been hectic, was back to work after a couple of days off and felt it would have been nice to treat myself to some delicious food for my dinner: I already eyed this recipe not long ago and was waiting for the perfect time to make it, a Monday night after a busy day. I ended up making a bit more and it lasted for Tuesday’s lunch and dinner: from one recipe I got out 3 meals! So, without further ado, here is the recipe for delicious Vegan Yachaejeon (Korean Vegetable Pancakes) by TheFoodieTakesFlight!

Vegan Yachaejeon (Korean Vegetable Pancakes) by TheFoodieTakesFlight

Ingredients 

  • 1 1/2 cup all-purpose flour
  • 2 tsp baking powder
  • 4 tbsp corn starch or potato starch
  • 1 1/2 tsp salt or black salt (for an “eggy” flavour)
  • 1/2 tsp turmeric powder optional for colour
  • 1 1/2 cup room temperature water, plus additional 2-4 tbsp water to adjust consistency

Vegetables of Choice (see notes)

  • 1 medium zucchini, sliced into match sticks
  • 1 small sweet potato, sliced into match sticks or shredded
  • 1 medium carrot, sliced into match sticks or shredded
  • 1/2 medium onion, thinly sliced
  • 1 long green chili or jalapeño, optional for heat
  • 1 bunch scallions or green onions, around 2 cups, chopped or thinly sliced
  • Other vegetables of choice sliced
  • Neutral oil (I used vegetable oil)

Dipping Sauce to Serve

  • 1 tbsp soy sauce
  • 1 tbsp water
  • 1 tbsp vinegar
  • 1 tsp sugar, adjust to taste
  • 1 tsp sesame oil
  • 1/2 tsp sesame seeds
  • Gochugaru or chili flakes/powder optional

Method 

  1. In a large mixing bowl, add in all the dry ingredients. Mix well.
  2. Slowly pour in the water while mixing. Mix until you’ve reached a thick batter consistency. If the batter is still too thick, you can add 2-4 tbsp more water. The batter has to be thick and should coat the vegetables well.
  3. Mix in the veggies of choice into the batter and mix evenly to coat. See notes for other vegetable options and cooking tips.

DIPPING SAUCE

  • Mix everything together and feel free to adjust to your taste. You can easily make this dipping sauce before hand.

COOKING THE PANCAKES

  1. Heat a medium/large non-stick pan over medium-high heat. Note that the size of your pancake will depend on the size of your pan.IMPORTANT: I highly recommend using a non-stick pan for the best results and so that your pancakes do not stick to your pan. It’s also important that your pan has been preheated well and is hot before you add in the oil and the veggies/batter.
  2. Add enough oil to add to coat the surface of the pan. Once hot, scoop a generous amount of the batter and veggie mix. Spread these over your pan and get these as thin as possible without exposing the surface of the pan.I use a spoon to spread it evenly onto the pan.If there are holes, feel free to scoop some of the batter to cover them.
  3. Cook for 4-5 minutes over medium or medium heat or until the batter starts to dry up. You can also cover your pan to cook down the veggies.
  4. If you covered your pancake, remove the cover and allow the excess steam to evaporate. Press down on the centre of your pancake. Once the top o the pancake and sides start to dry up, carefully scrape the sides and check underneath if the it’s lightly brown or golden.
  5. Carefully flip the pancake with a spatula. Cook the other side until golden brown and crisp.
  6. If you want extra crispness, allow the pancakes to cook over low heat for another 3-4 minutes on each side or until its a deep golden brown (a slight char is great too!) to get really nice and crisp on the outside.This way any excess moisture from the batter and veggies will evaporate and you’ll get crispier and less doughy pancakes.
  7. Repeat this for the rest of the batter.
  8. Slice your pancakes into small squares or bite-sized pieces and enjoy with the dipping sauce!

I hope you’ll enjoy them as much as I did!

Love,

TVCL xx

Recipe Sunday – The Best Vegan Banana Bread

Hello cuties! How are you? Did you enjoy last week’s celebrations? Here, I was craving some more sweeties, but didn’t want to overdo it with more refined sugars than what I already ate and I also had three bananas in the fridge that needed to be used. I came across this Vegan Banana Bread by HolyCowVegan and decided to make it – easy and delicious, banana breads are just that comforting amount of sweet that you can enjoy any time of the day!

Vegan Banana Bread by HolyCowVegan

Ingredients

  • 1 ⅓ cups flour (all purpose flour, a 50-50 mix of whole wheat flour and all purpose flour, or whole wheat pastry flour are all fine)
  • ½ teaspoon baking soda
  • ½ teaspoon baking powder
  • ⅔ cup sugar
  • 2 tablespoons flax meal
  • ½ teaspoon salt
  • 4 tablespoons vegetable oil (I use sunflower oil, but you can also substitute vegan butter)
  • 1 teaspoon apple cider vinegar
  • ¼ cup applesauce
  • 4 very ripe bananas (mashed or blended until smooth with few or no lumps, You will need one more banana for the optional decorative top)
  • ¾ cup walnuts (or pecans, lightly toasted, then chopped)

Method

  1. Preheat the oven to 350 degrees F/175 degrees C. Oil an 8 ½-inch by 4 ½-inch loaf pan.
  2. Whisk the flour, salt, baking soda, baking powder, sugar and flax meal in a bowl.
  3. Add apple cider vinegar, applesauce and mashed bananas to the flour mixture. Mix until just combined and there’s no dry flour in the bowl.
  4. Fold in the chopped walnuts.
  5. Pour the batter into the loaf pan and spread evenly with a spoon or spatula. If using a banana to decorate the top slice it lengthwise into three slices, then halve each slice. Arrange on top of the loaf.
  6. Bake the banana loaf about 50-55 minutes until a toothpick inserted in the center comes out clean.
  7. Place the banana bread on a cooling rack for about 10 minutes, then unmold and let cool completely on the rack.

Nice and easy, let me know if you liked it!

Love,

TVCL xx